CentOS 7: Installing
Содержание
Preface
A couple of words, why still CentOS, and not something else. General familiarity with Linux started in the year 2000 with some version of RedHat. Then there was the BlackCat Linux (because of its better support of the Russian language). Then came the Gentoo and I found it ideal for that due to the USE flags you only what you need. Oh and for the optimization of the more or less normal to watch movies on a computer with an AMD K6-2-300 can be only under Gentoo. After the Gentoo at work was Ubuntu, but it just didn’t go. Even after moving to any other Gentoo Linux is difficult. It’s like after OS X Windows back on land. In Gentoo and the boot process, and many other things are beautiful from the aesthetic point of view, in Ubuntu by default in a console only white on a black background.
Then there were courses on RHEL and certificate RHCSA. I find that stupid not to use knowledge – therefore decided to install CentOS onto a couple of servers to work under different services. In the process of so doing that even your own personal server is changed from Gentoo to CentOS. First there was the CentOS 5, then CentOS 6, and CentOS 7 is now.
Upgrade to CentOS has become much less time to leave on server maintenance time, as running the command:
$ yum -y update
runs faster than executing a command
$ emerge sync && emerge -upvND world
Yes, and many surprises during the update, the system has become less. Although Gentoo, I am grateful for this experience.
Before installing CentOS 7 suggest to read this booklet RHEL 7: Installation Guide. Here you can download the whole or in the form of a .pdf file or as .epub file, who both will be comfortable. This is the official guide to install RHEL 7 (with Russian). And since RHEL is virtually the same as CentOS are all described in the brochure applicable to CentOS.
Download CentOS image
To install CentOS you must first download the installation CD image as an iso file. To do this, go to the Downloads section on the site of CentOS – http://www.centos.org/download/ and there we find the section «Minimal Install Images» and click on the link «Download the Minimal ISO» – http://isoredirect.centos.org/centos/7/isos/x86_64/. Then choose the nearest mirror and download the file CentOS-7.0-1406-x86_64-NetInstall.iso (in my case I connect to Yandex services via 100 MBit link so downloading with its mirrors).
Create installation media
To install CentOS virtual machine – simply specify the iso image as a virtual disk drive. If the installation will be done with the CD – burn the iso image to a CD any program available. You can burn the iso image to a USB drive and boot to it. To do this in Linux you can use the following command:
$ dd if=/%filepath%/image.iso of=/dev/%devname% bs=512k
Instead of %filepath% need to specify the full path to the .ISO file and instead, %devname% must specify device name under which a Linux sees USB drive. Keep in mind that the USB drive at this point should not be mounted as well.
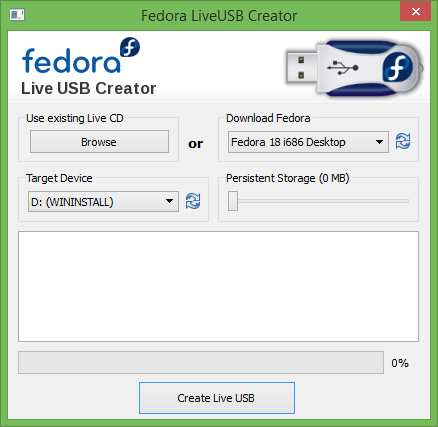
In Windows, to burn the iso image to a USB drive, you can use the Fedora live USB Creator program (https://fedorahosted.org/liveusb-creator/). You must download and install this program. Keep in mind, for her work to run with administrator privileges. After starting, click the iso image to write by clicking on the Browse button, then the Target Device, select the USB drive to record and click on the button «Create Live USB» button.
Prepare a virtual machine
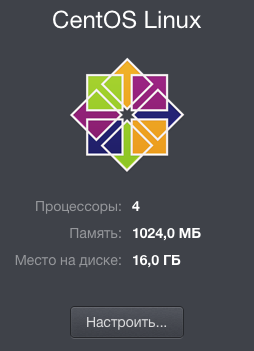
In Parallels Desktop, click on the button «Create…» to create a new virtual machine, Parallels the wizard then select «Install Windows or another OS from the DVD or from the image» and click on the button «Continue». In the new wizard, Parallels, select «Image» and drag the iso image on the window of the wizard. The wizard will swear the message «Unable to determine the operating system», are not going to pay attention to it and click on the button «Continue». The wizard prompts you to select the operating system from the list, choose «CentOS Linux» in it under «Other versions of Linux» and click «OK». Select the name of the virtual machine, choose a location for the virtual machine, put a tick next to «Configure settings prior to the installation» and click on the button «Continue». Paint all the settings for the virtual machine, Parallels makes no sense, I note only that it is better to specify at least RAM 1GB, number of processors, can be increased to the maximum, and that’s hard disk can be cut back to 16GB (by default, Parallels makes 64GB). For a minimal installation and configuration of the basic network services 16GB it should suffice. Also pay attention to the network settings of the virtual machine to install we need to in a virtual machine is available Online (you can specify a network share instead of pavement, then the virtual machine in the local network). I’m back in the «Security» tab in the settings of the virtual machine, put a checkmark in the «Integration points: Isolate Linux from Mac» and «Time Machine: turn off» (because the virtual machine test). Now close the settings again, click on the button «Continue».
Start CentOS installation
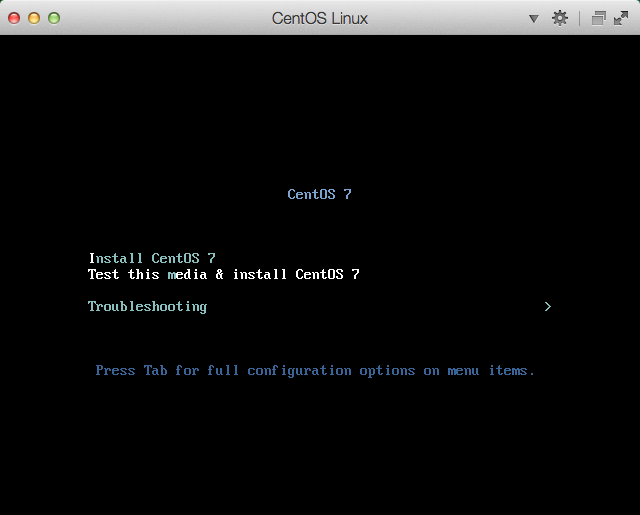
We start our computer (or virtual machine) from the media that we have prepared (or directly from the iso image). After the menu appears, which prompts you to start the installation process (click «Install CentOS 7» or run diagnostics and then start the Setup process (click «Test this media & Install CentOS 7»). Choose the second option and press «Enter».
After testing the media will be runs the CentOS 7 installer.
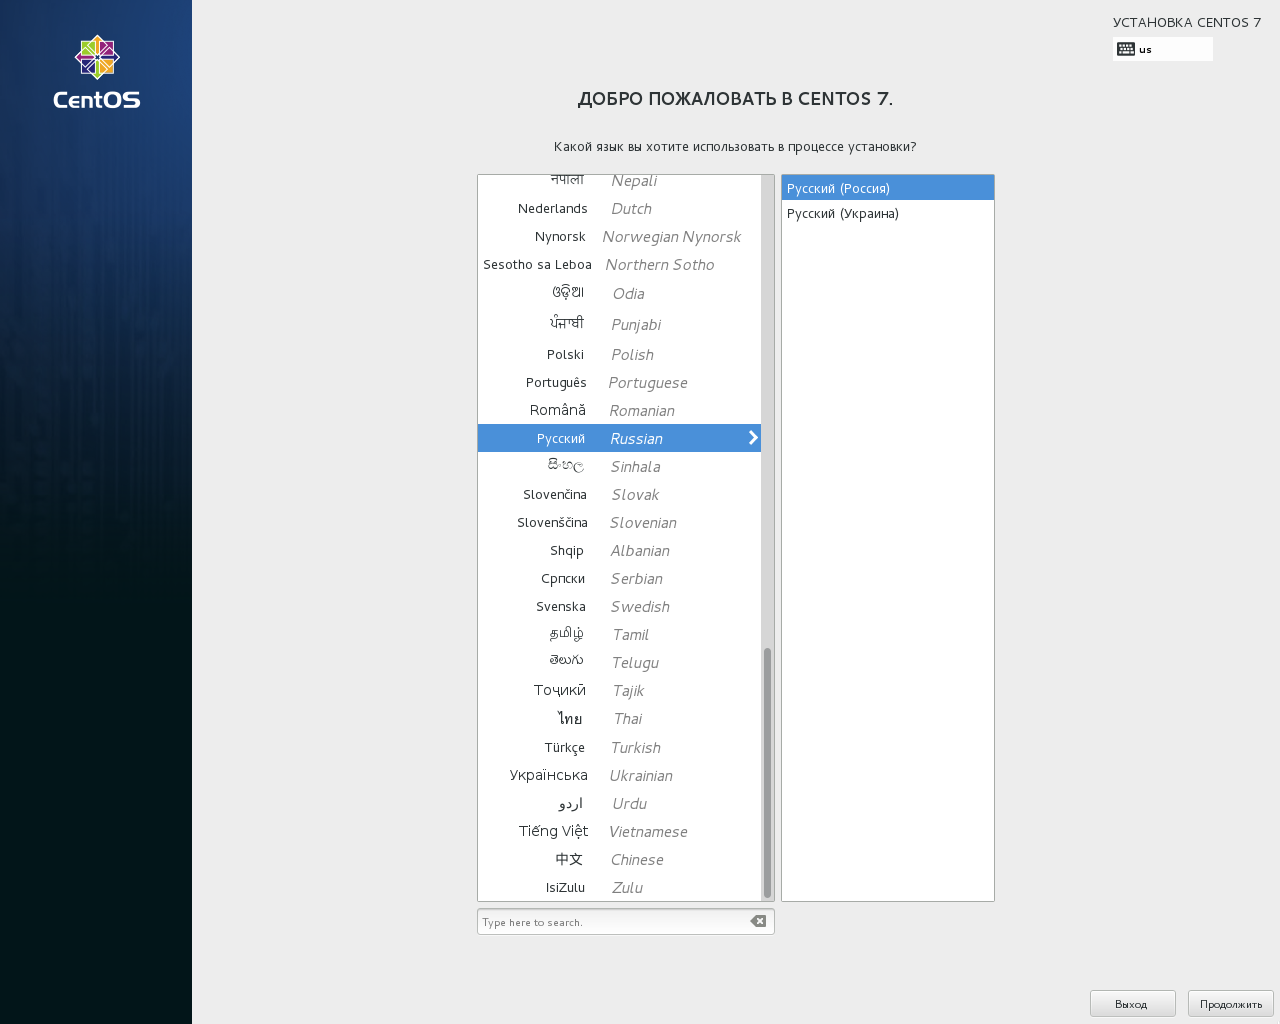
In the first window, select Installer Russian language and click on the button «Continue».
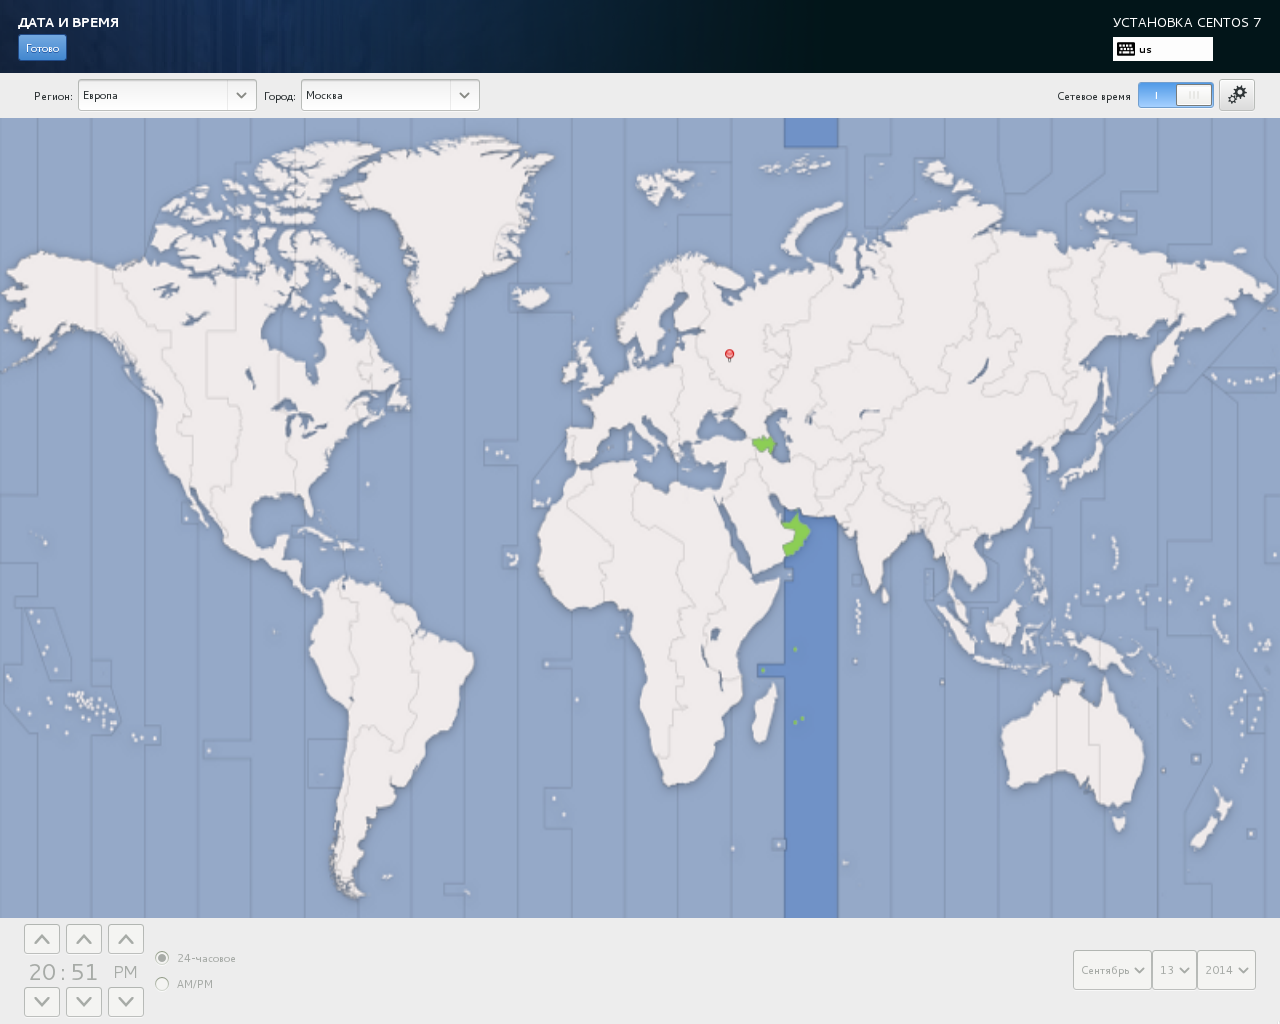
Select your time zone and time setting the date as long as skip, is still up to the NTP client network settings will not be available.

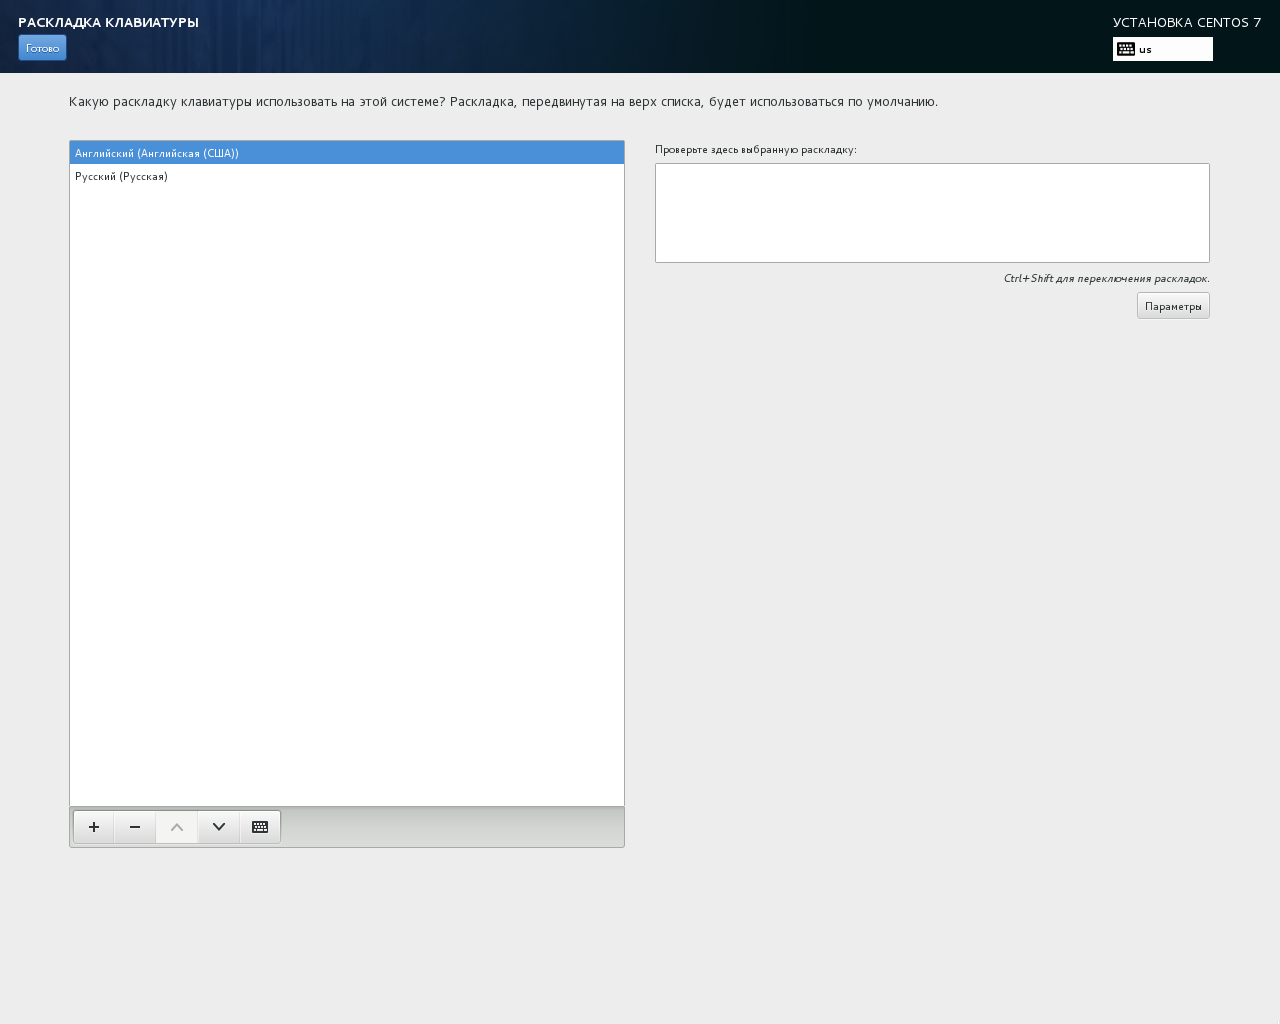
Let’s start with the keyboard settings, for this click on the button «Keyboard» and change the priority of the keyboard by moving the English layout upstairs. Just by clicking on the «Settings», you can change the key combination for switching keyboard layouts (for example Ctrl+Shift). Then click on the button «Finish».
For network settings click on the «Network name» and under «System Settings». By default, the network is disabled, to enable it, press the switch that is located in the upper right corner of the screen. All the network settings will be determined from DHCP server and determined from DNS host name. If this data is not automatically determined – you need to manually add them by clicking on the «Customize…».
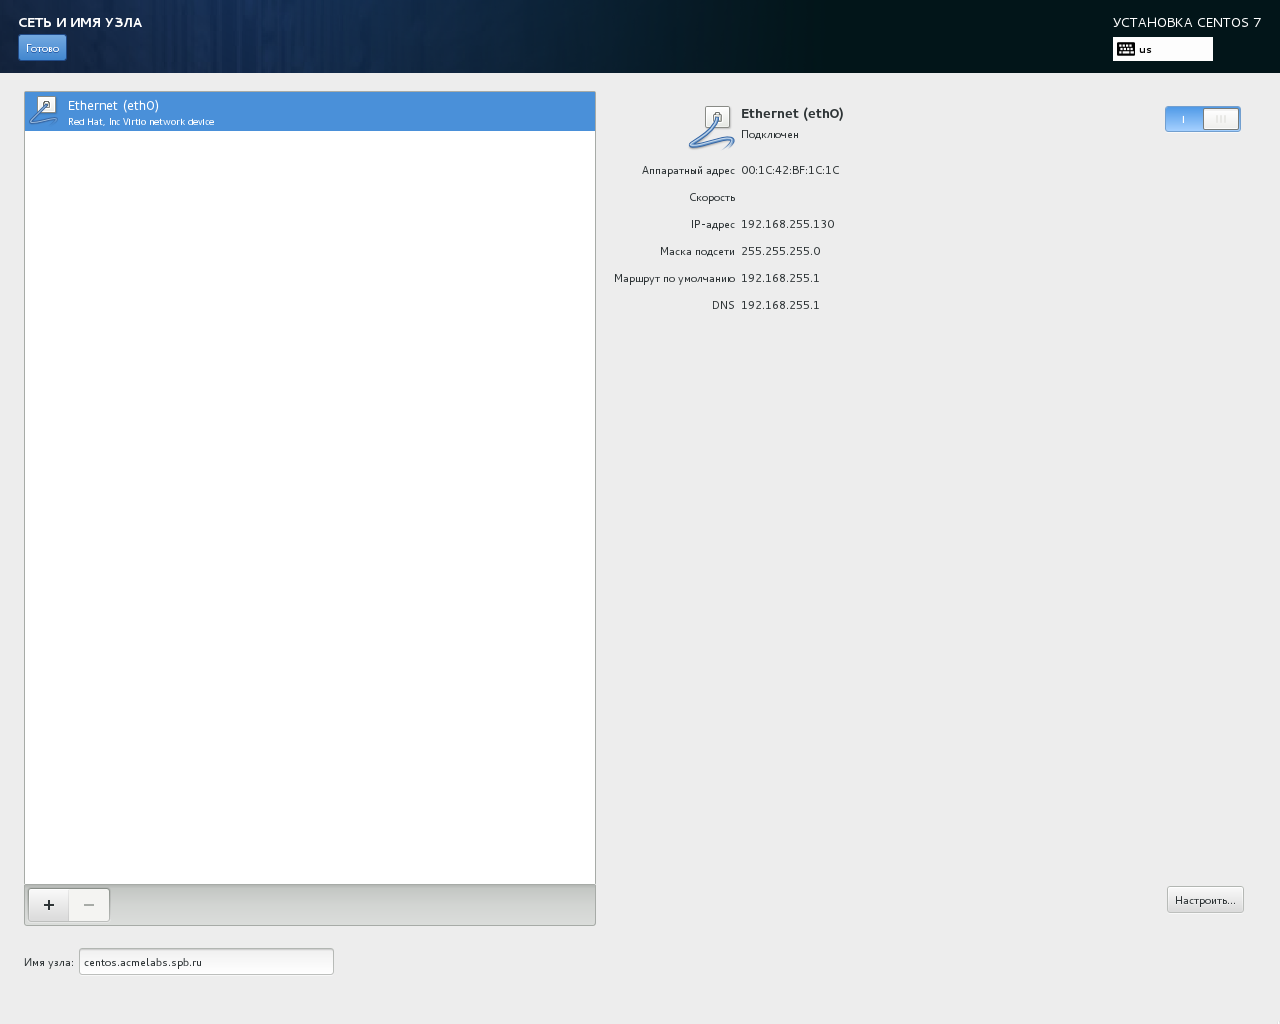
The «General» tab put a tick next to «Automatically connect to this network when it is available».
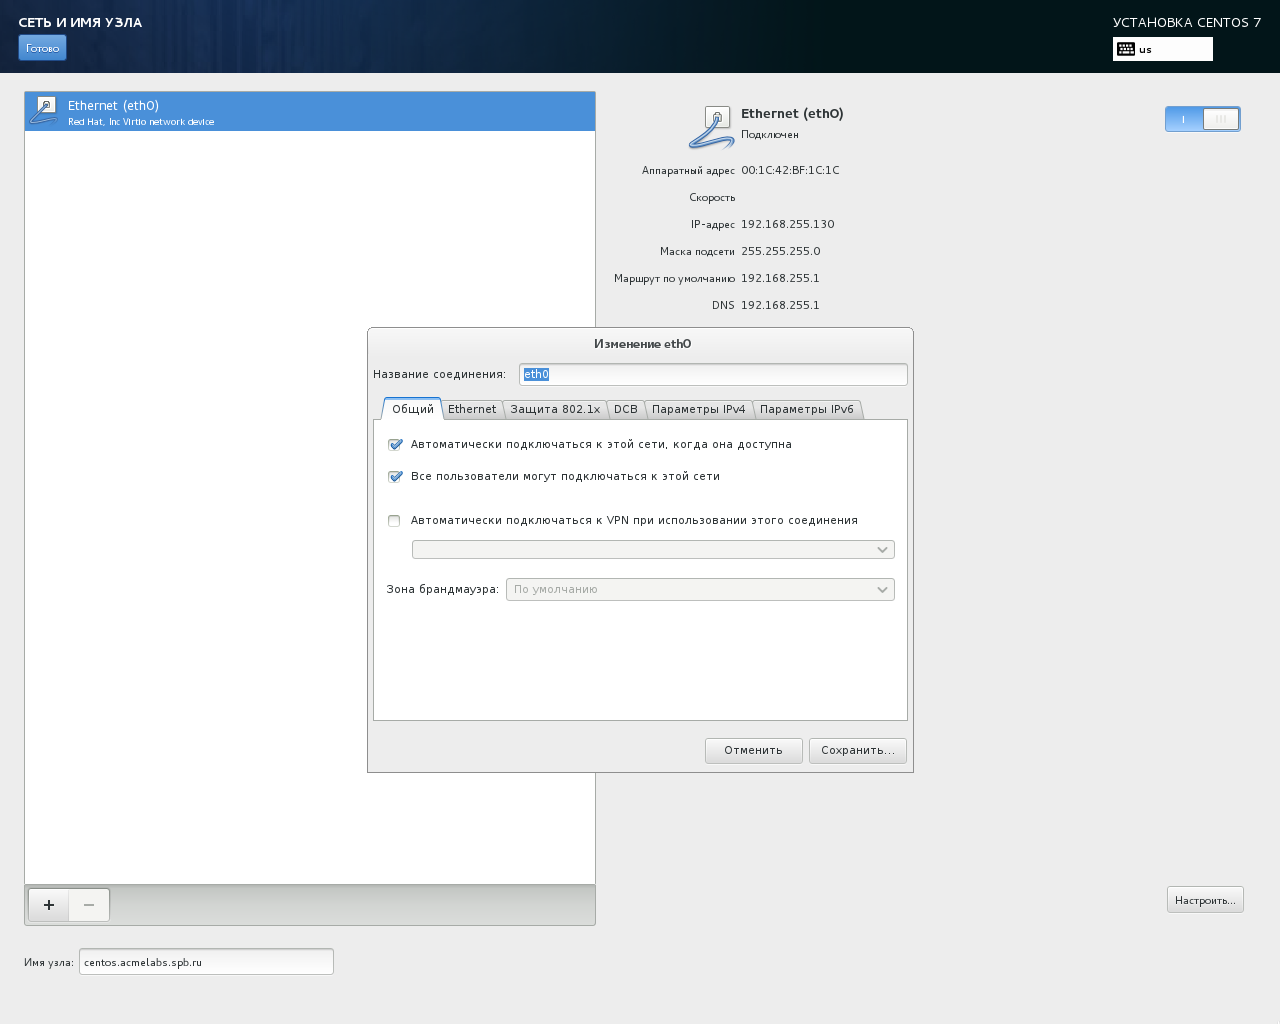
In the «IPv4 Settings» tab in the how to configure the or leave the selected «Automatically (DHCP)». If your network uses DHCP or change to «Manual» and fill all the remaining fields.
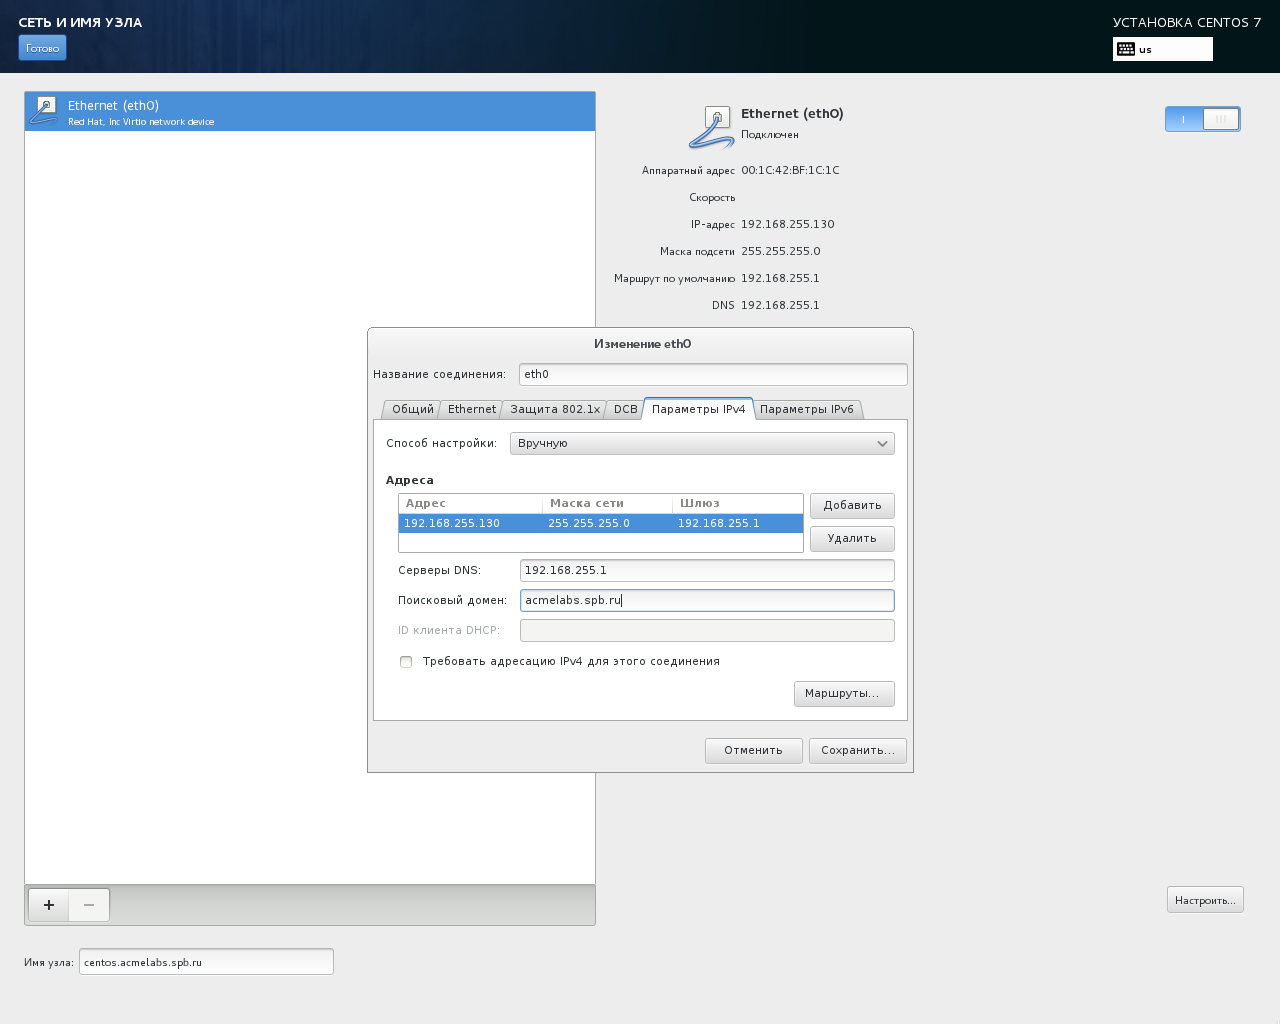
If we do not use IPv6 network, then the «IPv6 Settings» tab in the how to configure the select «Ignore».
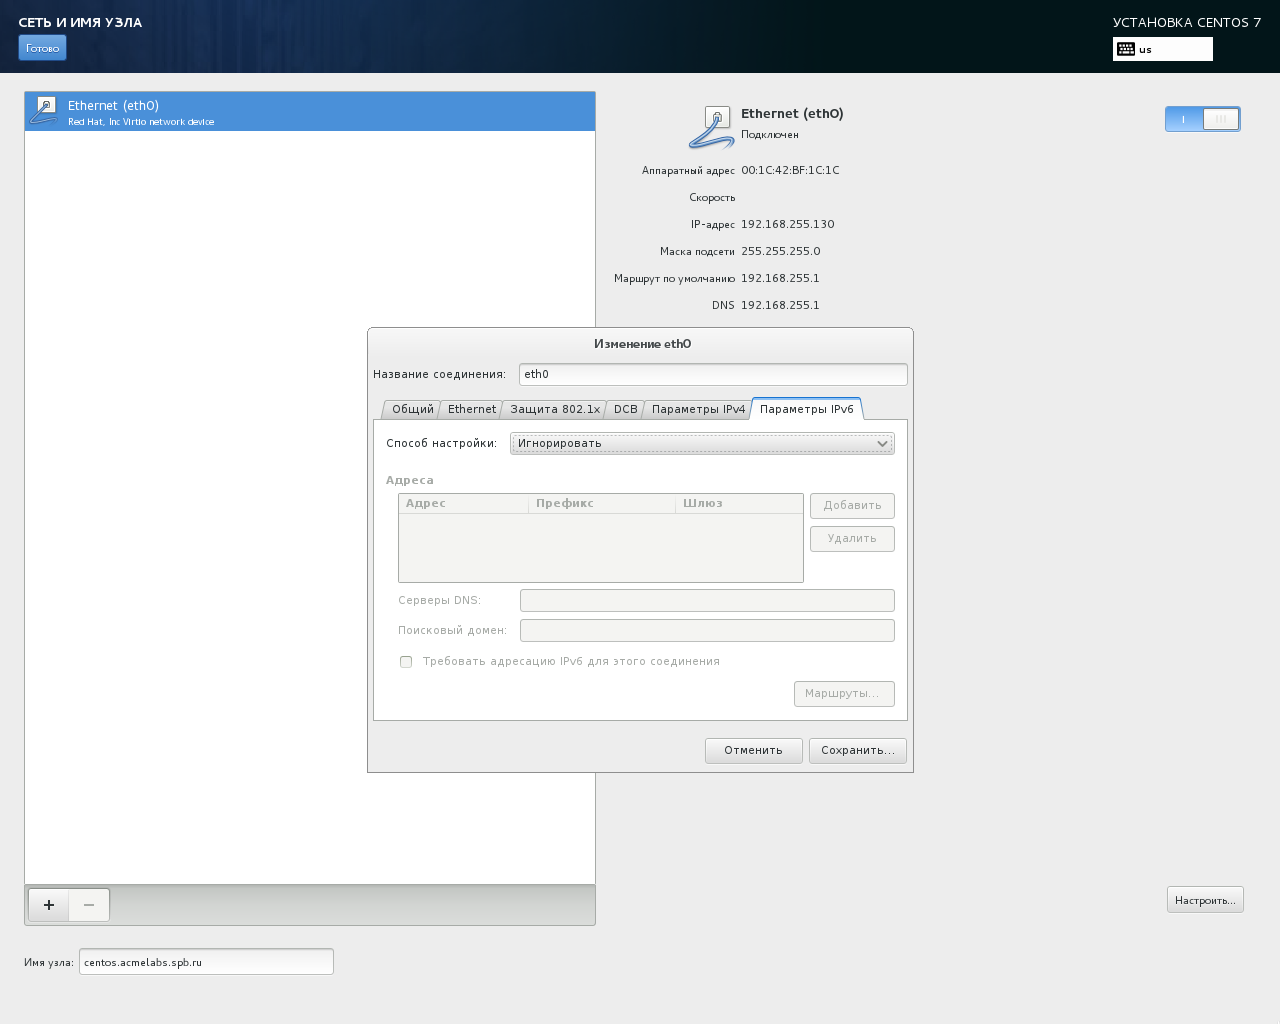
After you save the network settings click on the «Finish» button in the upper left corner of the screen. Now you can go back to that step and configure the time zone and date. To do this, click on the «date and time» in the block of international. First choose a region and city, and then in the upper right corner click on switch «Network Time». After this time must be synchronized with the NTP server. You can click on the button «Finish» to return to the main menu of the installer.
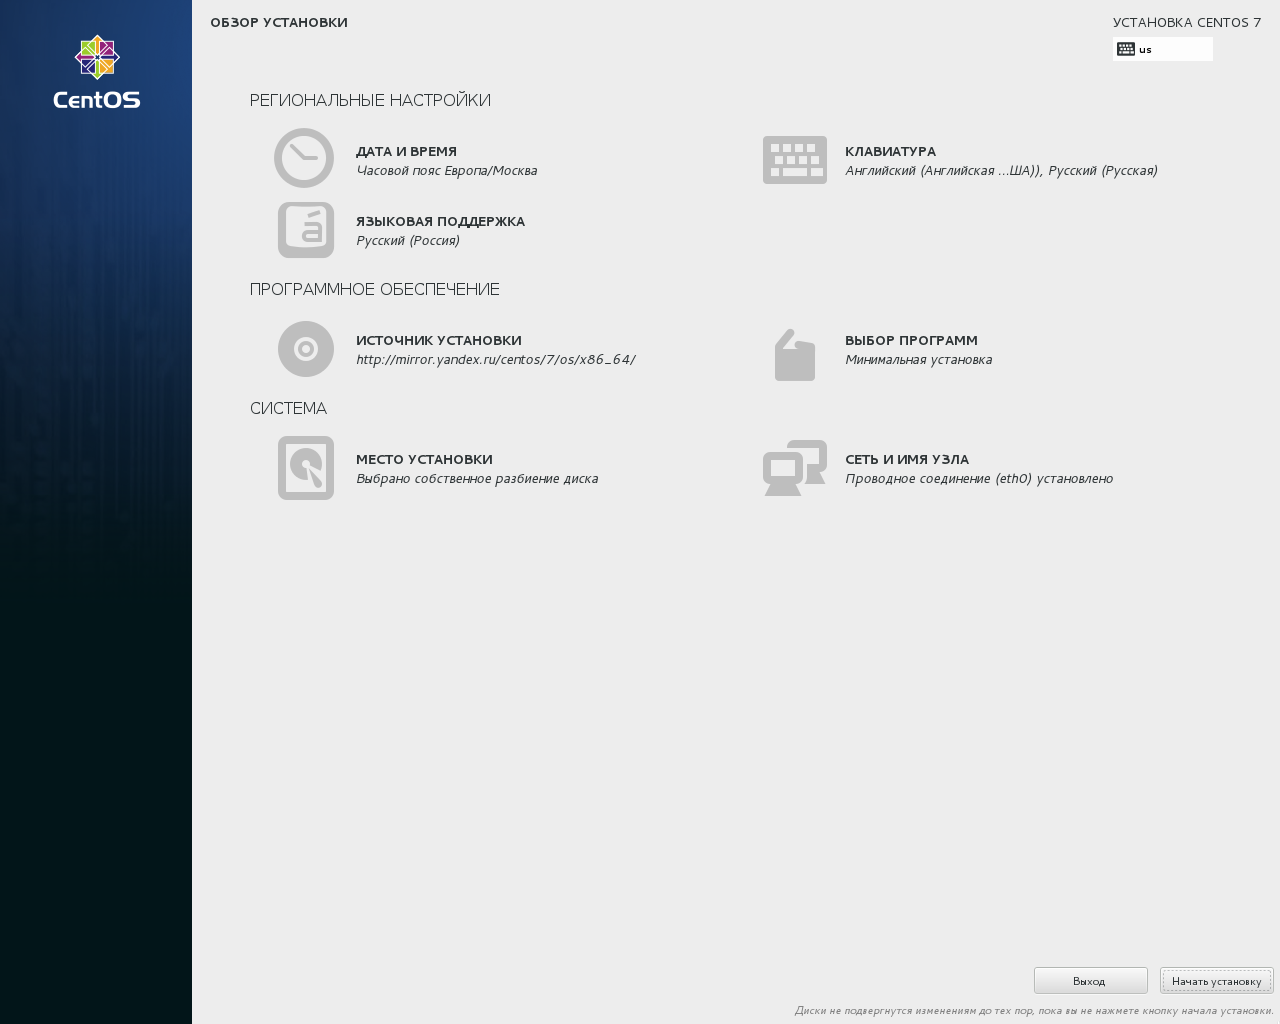
Now let’s specify the repository from which you will install CentOS, for this now click on the button «Installation Source» in the block «Software». In the field, specify the path to the installation source, the primary repository of CentOS (in my case, I specify mirror.yandex.ru/centos/7/os/x86_64/). If you have access to the Internet is via proxy – the time that is specified by clicking on the button «Configure proxy…». Now click on the button «Finish».
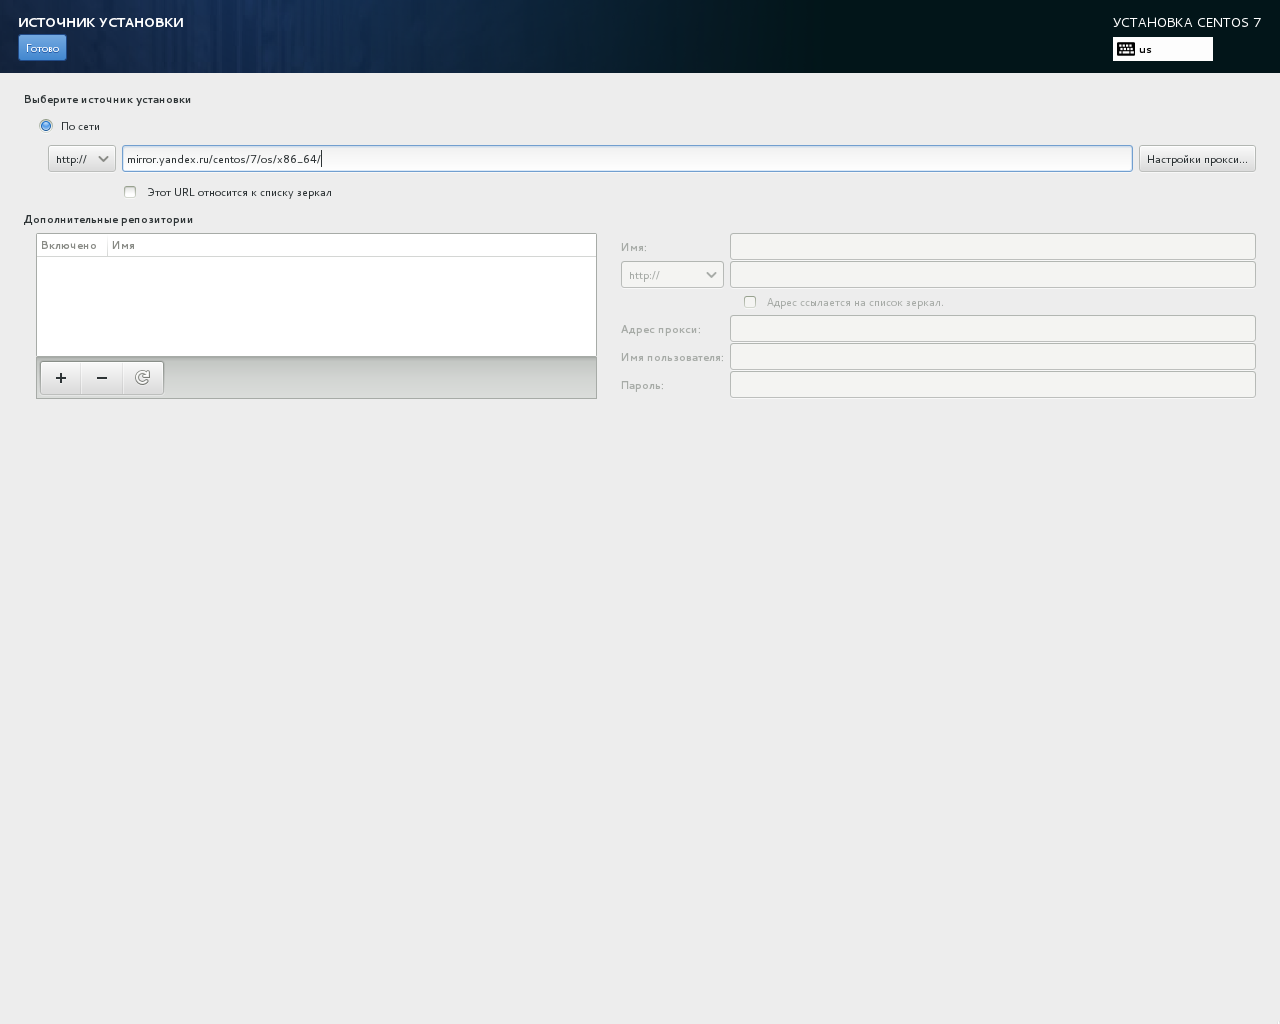
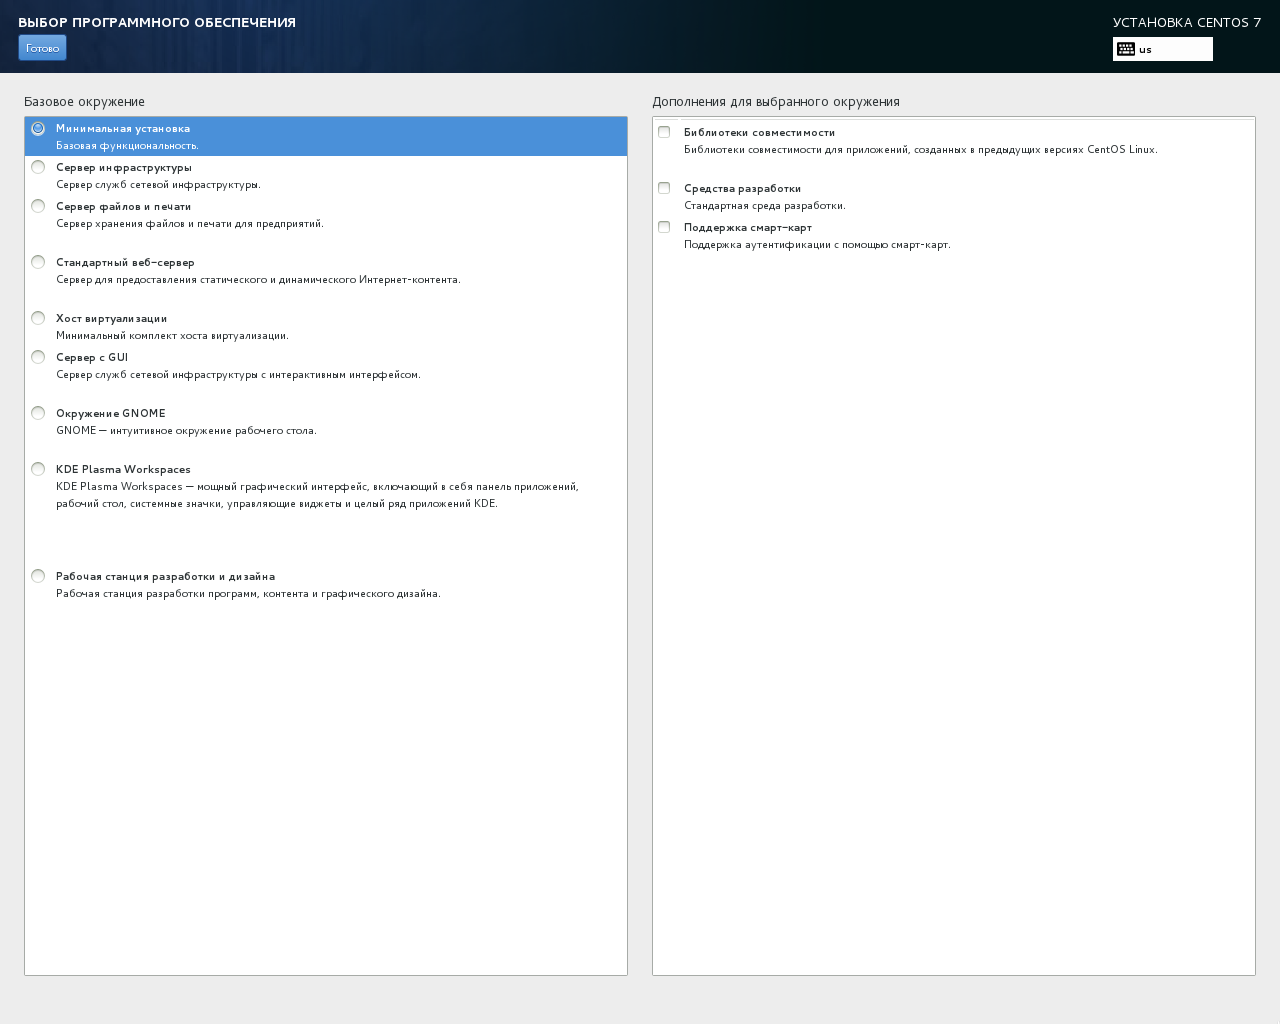
If the address of the repository is correct, now called «Installation Source» button will display the address of the repository, and button icons with orange triangle will hide. If this happens, click on the button «Select program» in the block «Software». During the initial installation, I set only the minimal set of programs and services that will run on the server, install and configure later. So leave the selected paragraph «minimum installation» and click on the button «Finish».
Left adjust the location of the installation, and click the button «Place setting». Look what ticked is the desired hard disk, mark the item «I will configure the partitions» in the «Split» and click on the button «Finish».
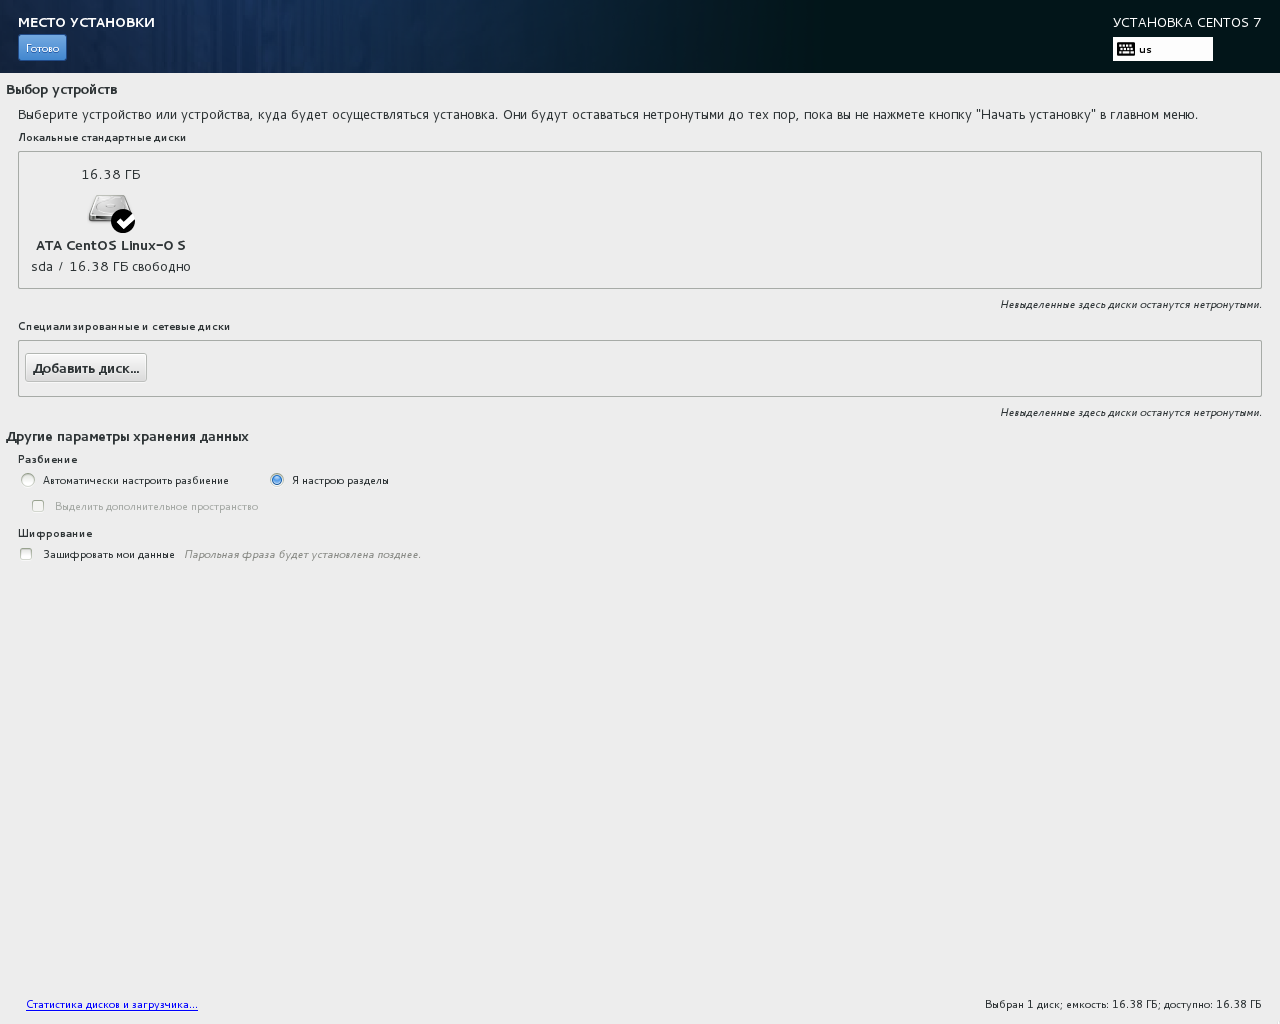
We have partitioning Wizard opens. First, click on the button «Click here to automatically generate them».
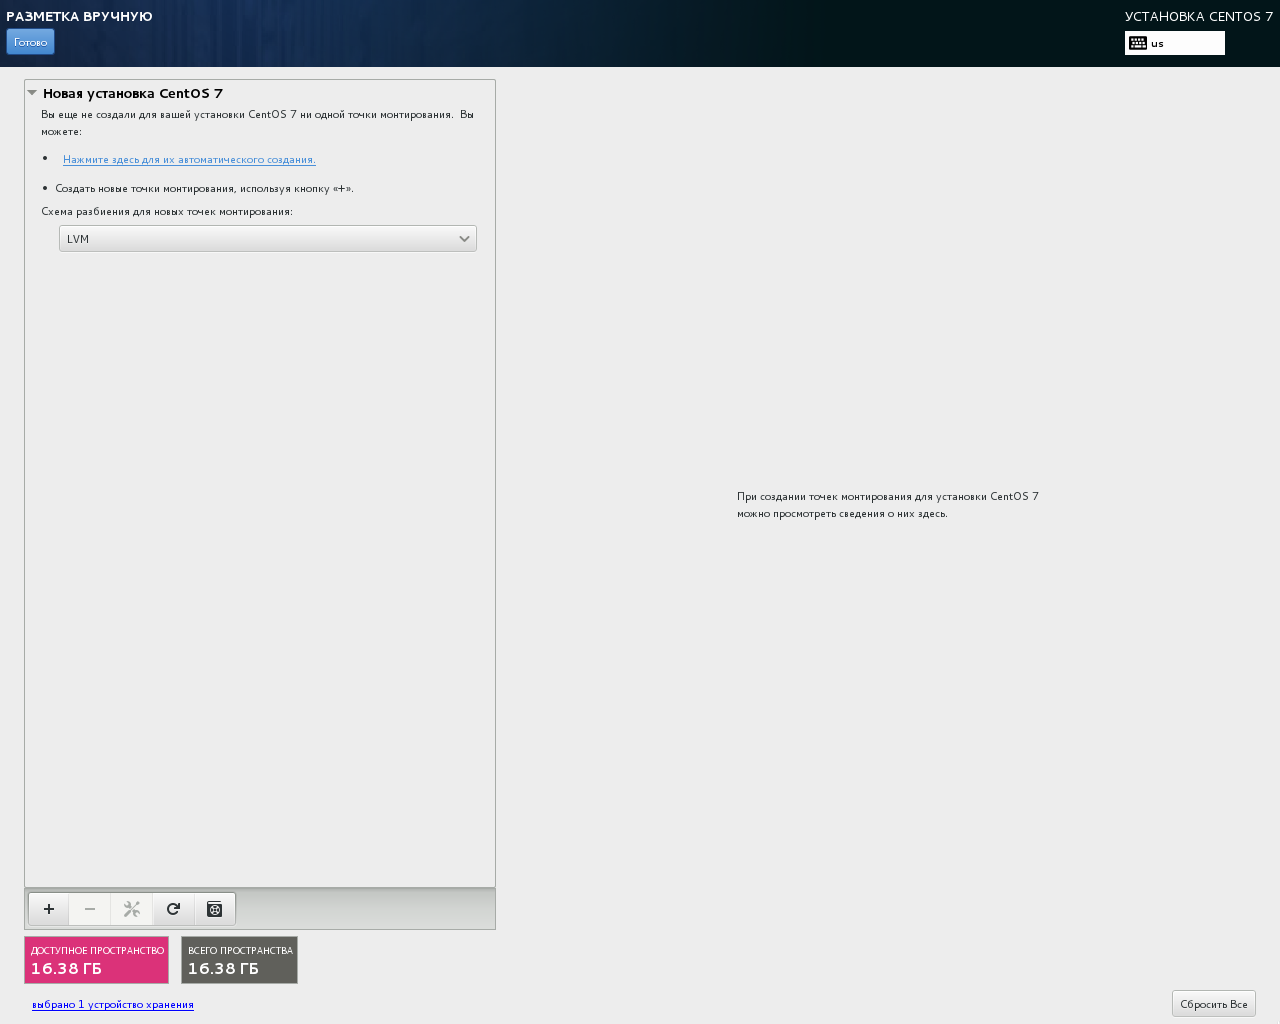
Now a little touch up automatic breakdown.

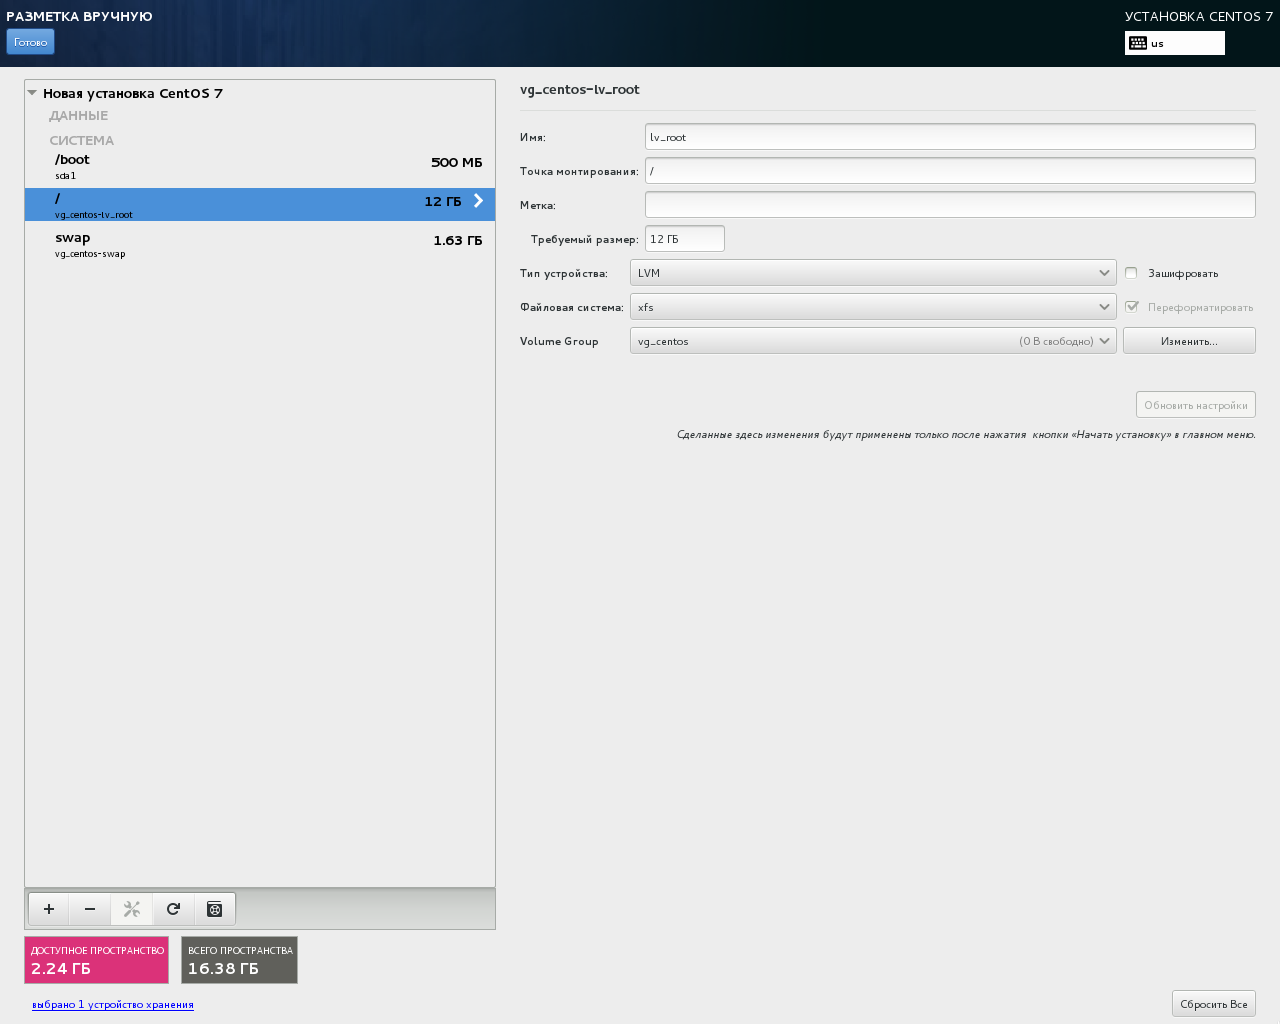
To do this, first select the root partition «/» and change the size to 12GB. The type of device the LVM and xfs file system stay the same, but the name «Volume Group» let’s change the click on the button «Modify…». By default, the installer calls the LVM volume group as hostname_hostname, replace it to vg_hostname and click on the «Save» button (instead of the hostname with the name of your host). Now let’s change the name of the section to lv_root, instead of the root and press the button «Update settings».
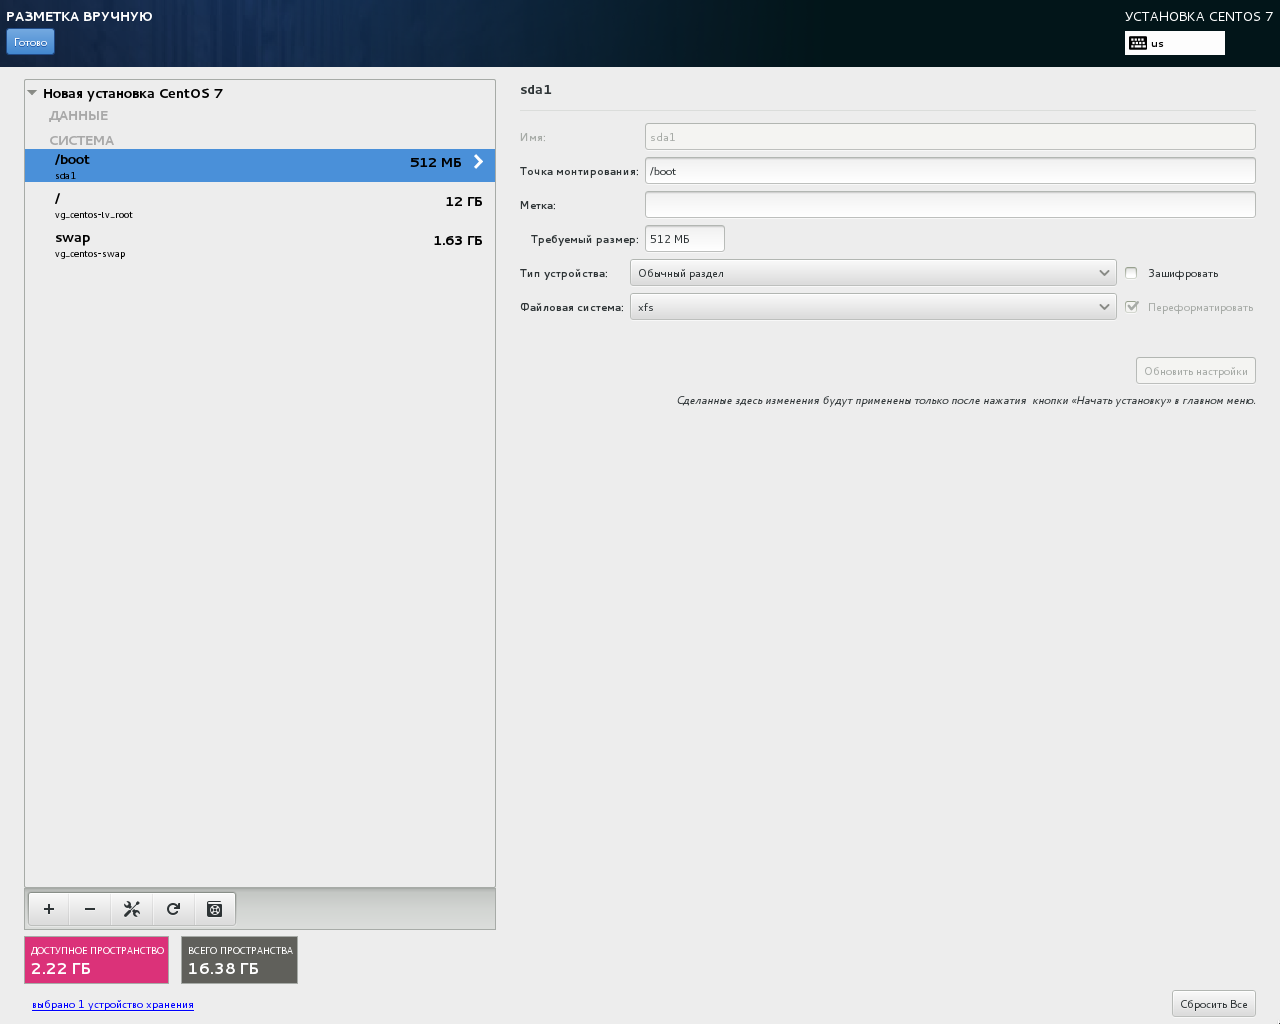
For an even number will replace the /boot partition size is 500MB instead of 512MB point. Device type /boot partition leaving normal, file system, just leave the xfs, then click on «Update preferences» button.
And finally change the settings section for the swap. The section name is interchangeable with swap on lv_swap, and increase the size to 4GB, and then push the button «Update settings». As the drive to install CentOS I only have 16GB, and we have already made partitions on a 16GB (12GB + 512MB + 4GB) – the installer automatically partition for the swap changed to 3,864GB limits.
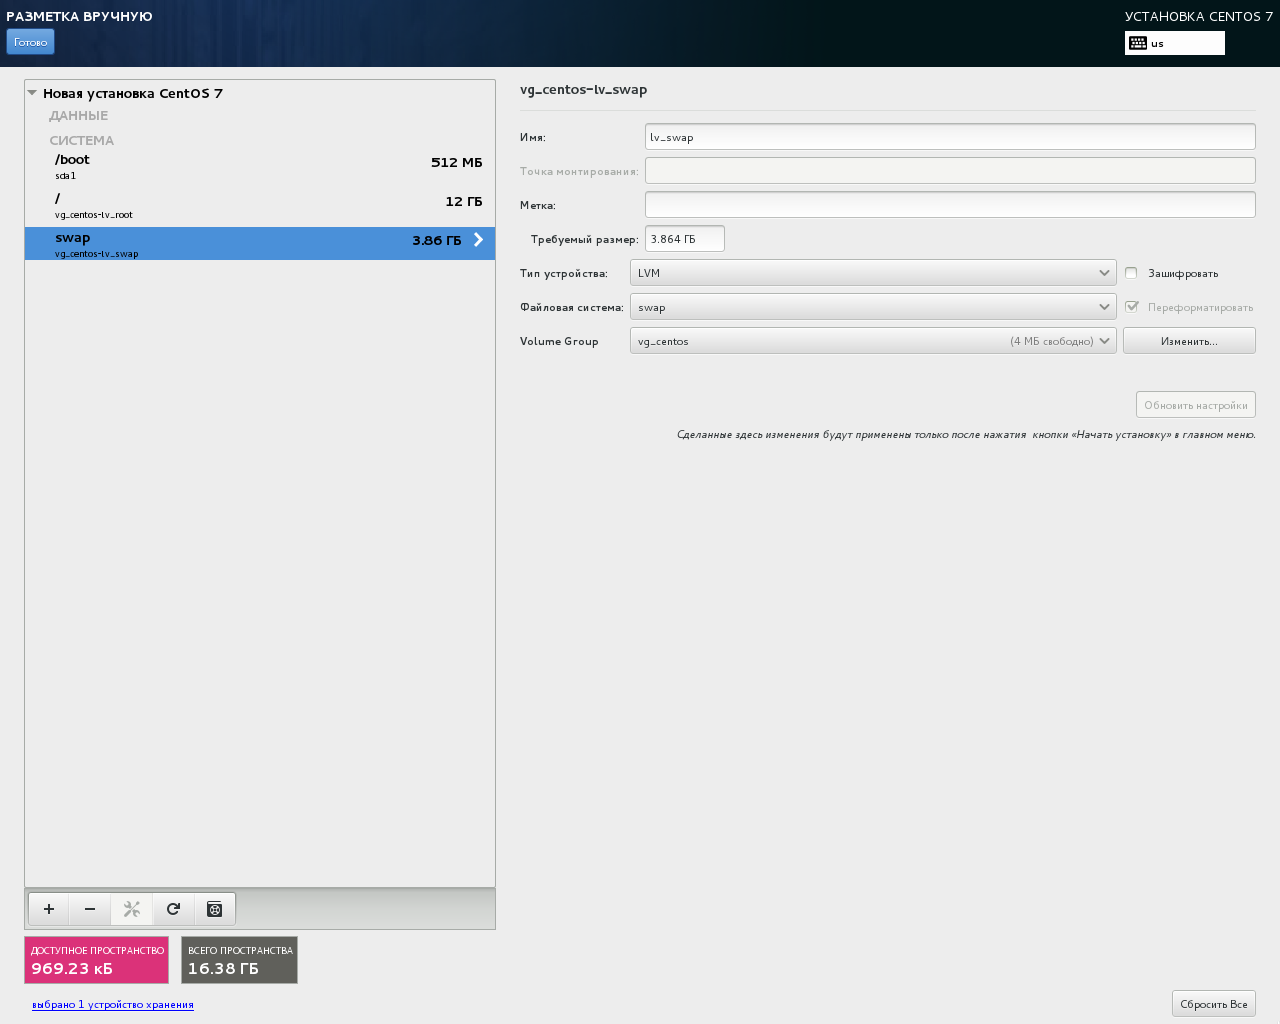
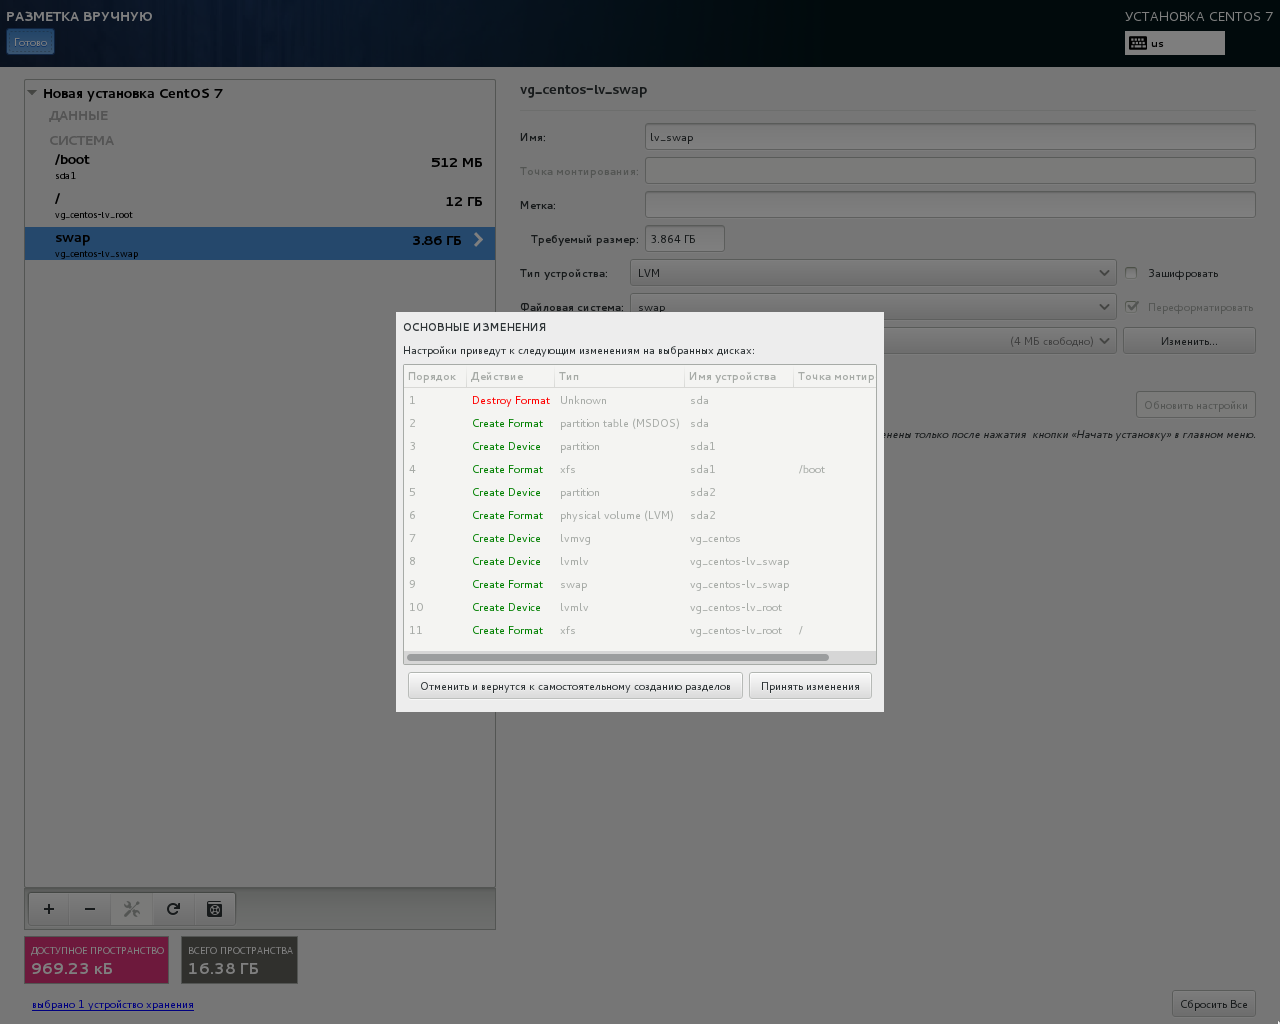
So as the root partition and swap partition we created as LVM volumes, then expand them in future not take much. Having completed the disk layout click on the button «Finish». We will show the markup sequence installer disk, we need to confirm by clicking on the «Apply changes».
Once everything has been prepared for installation of CentOS – click on the button «Start installation».
The first thing the installer will mount the disk partitioning Setup, as we indicated earlier. Then partitions will be formatted and installation of packages. A minimal installation of these packages is 298. After you have installed the packages will be shipped to their initial setting.
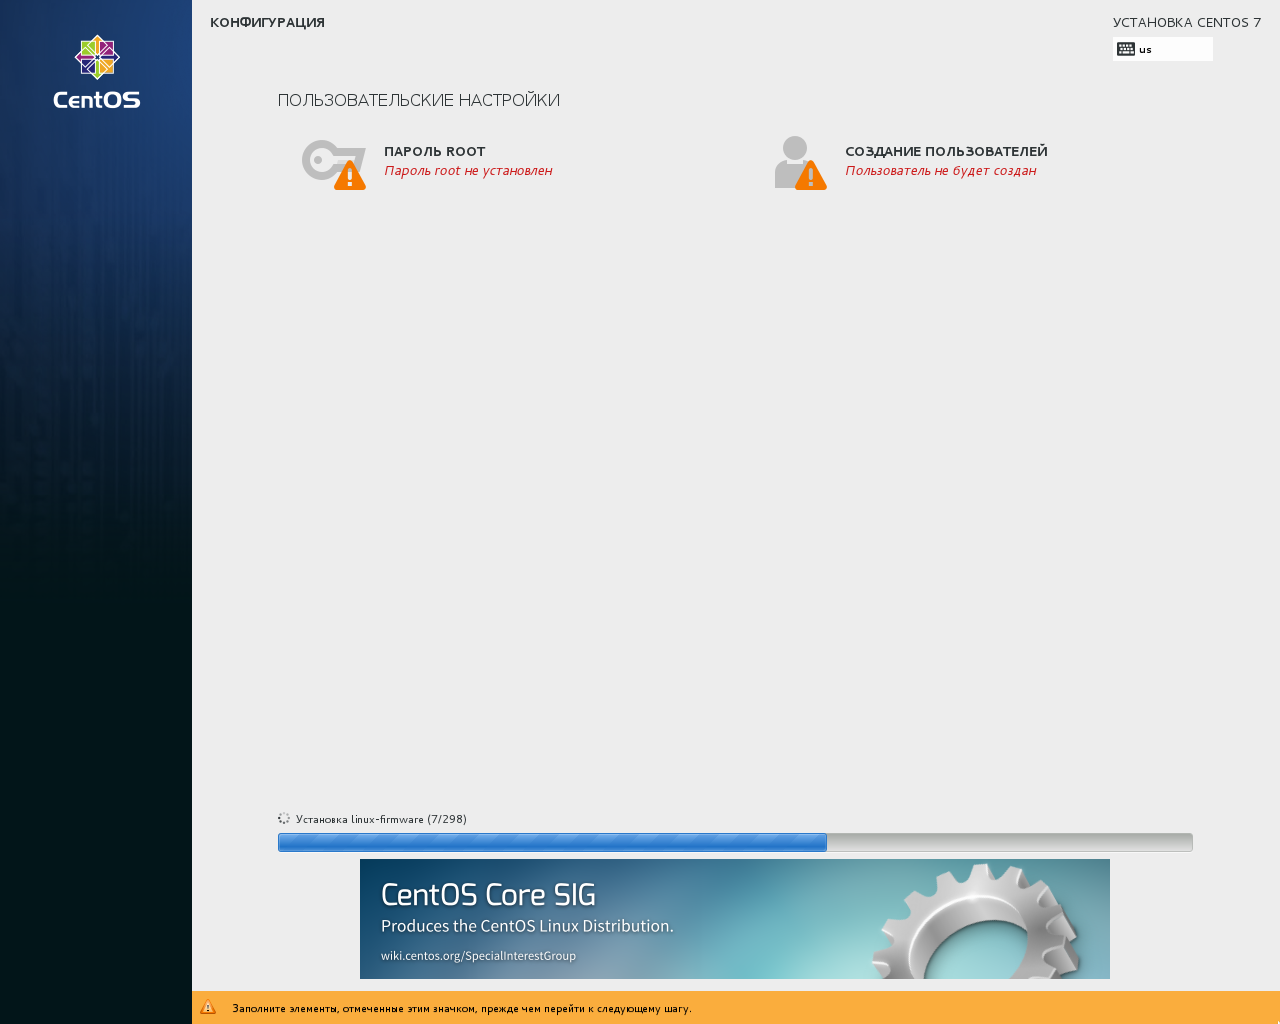
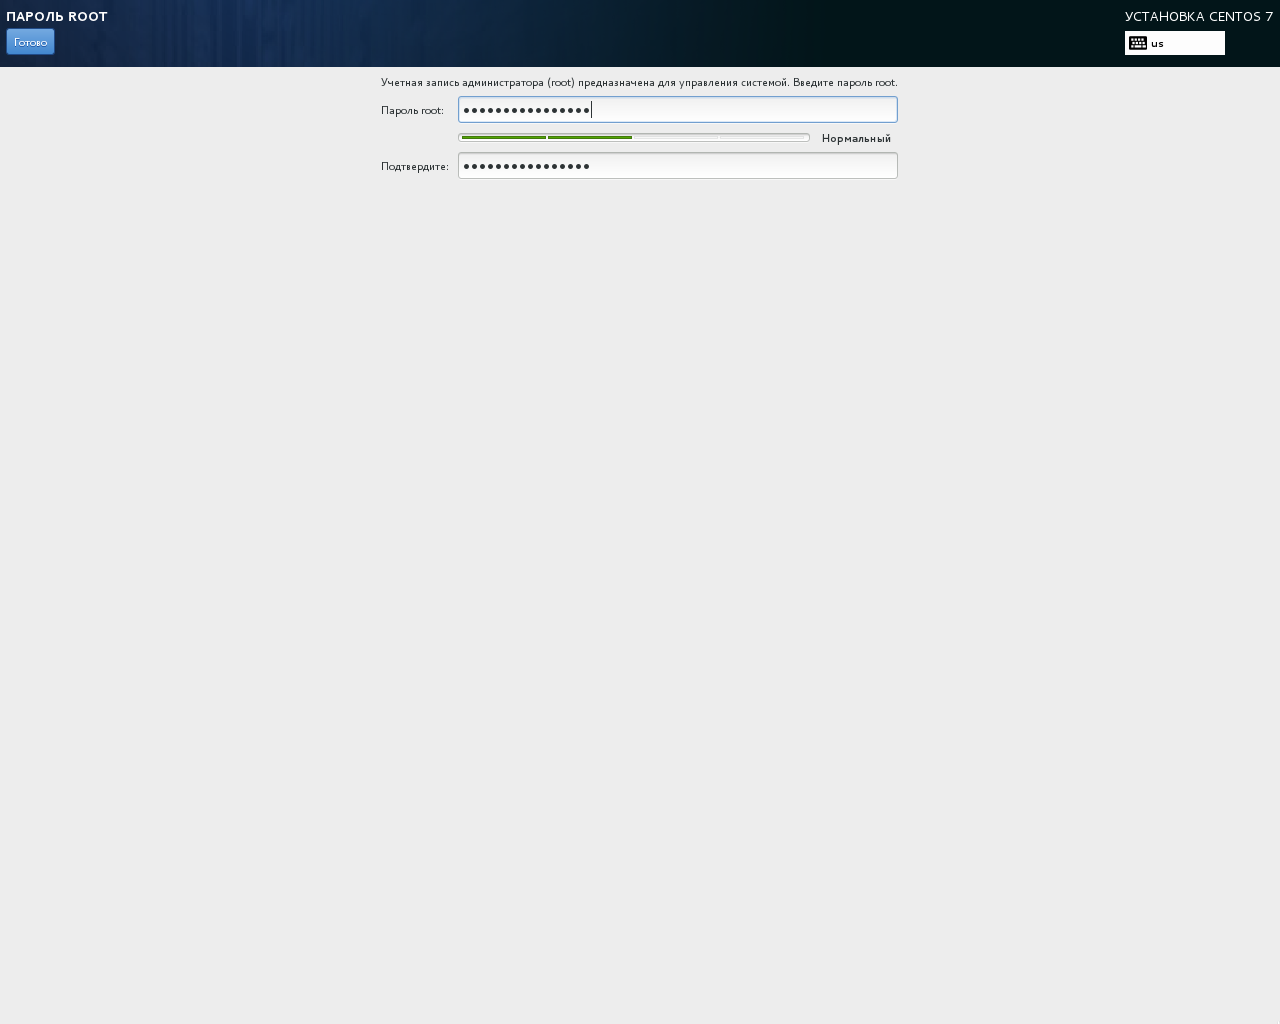
While packages are installed and configured, we set the password for the root user and create a user for everyday work (during the installation of the create user step is not mandatory, it can be at any time later).
The last step before reboot the installer configures the operating system boot loader. Then you will need to click on «Reload» in order to load freshly installed CentOS.
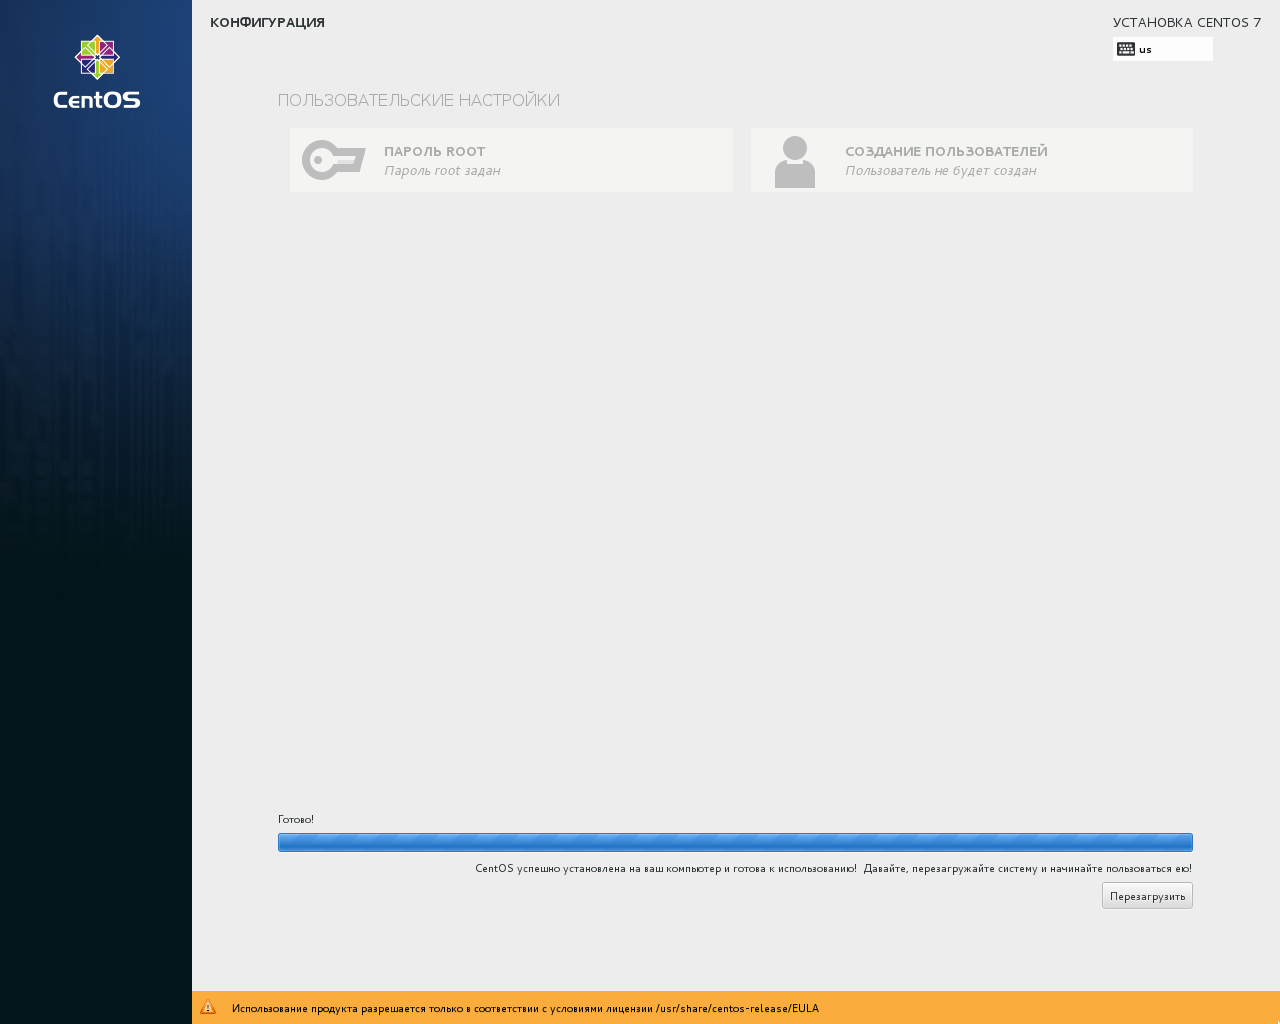
Congratulations! CentOS installation is complete.
Before configuring a CentOS 7 read this here’s the brochure RHEL 7: System Administrators Guide. This is the official guide to configuring RHEL 7 (on Russian language this brochure not yet translated).
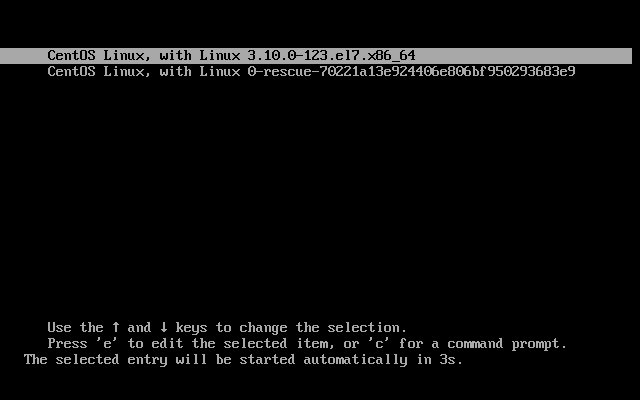
First run CentOS
After downloading the boot loader the boot selection menu appears, in which you can not press anything, by default, the first option will start a «CentOS Linux, with Linux 3.10.0-123.el7.x86_64».
The default booting enough silent, not showing absolutely nothing. But after booting we will see the standard prompt for a user name and password.
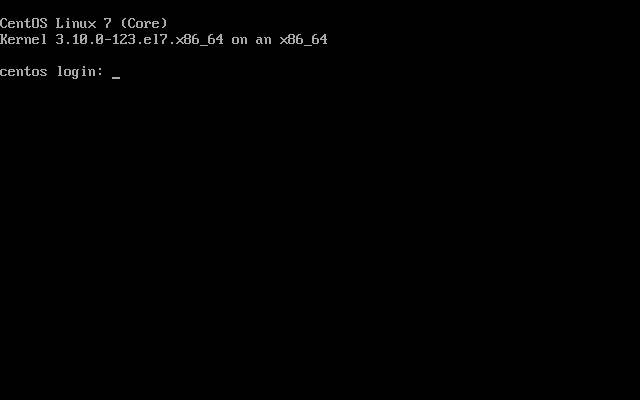
Continue to how convenient – you can either connect via ssh, or be using the console.
After login in CentOS first time – you need to perform some additional configuration. First, install the editor nano, and are doing so that all mail sent to the root user – will forwar to your email address.
$ yum -y install nano
$ echo %email% >~/.forward
$ chcon -u system_u ~/.forward
In CentOS 6 then you must still restore the default SELinux context for .forward file with the command:
$ restorecon -v /root/.forward
In CentOS 7 file is created with a correct context.
Set the locale and the Russian keyboard layout
$ localectl set-locale LANG="ru_RU.UTF-8" LC_NUMERIC="C" LC_TIME="POSIX" LC_MESSAGES="POSIX"
$ localectl set-keymap us ru --no-convert
$ localectl set-x11-keymap us,ru pc105 grp:ctrl_shift_toggle --no-convert
$ localectl status
   System Locale: LANG=ru_RU.UTF-8
                  LC_NUMERIC=C
                  LC_TIME=POSIX
                  LC_MESSAGES=POSIX
       VC Keymap: us
VC Toggle Keymap: ru
      X11 Layout: us,ru
       X11 Model: pc105
     X11 Variant: grp:ctrl_shift_toggle
$ sed -i --follow-symlinks 's/vconsole.font=[^ ]*/vconsole.font=latarcyrheb-sun16/g' \
	/etc/sysconfig/grub
$ sed -i --follow-symlinks 's/vconsole.keymap=[^ ]*/vconsole.keymap=ru/g' \
	/etc/sysconfig/grub
$ grub2-mkconfig --output=/boot/grub2/grub.cfg
Now after restarting the console we can switch keyboard layout by pressing Ctrl+Shift. Well, until the reboot will not manually load the desired layout is as follows:
$ loadkeys /lib/kbd/keymaps/i386/qwerty/ru.map.gz
Disable IPv6
There are two options for disabling IPv6 in CentOS 7, first edition hard:
$ sed -i --follow-symlinks 's/^GRUB_CMDLINE_LINUX="/GRUB_CMDLINE_LINUX="ipv6.disable=1 /g' \
	/etc/sysconfig/grub
$ grub2-mkconfig --output=/boot/grub2/grub.cfg
It prohibits the kernel to load the modules associated with IPv6. This is bad because if SELinux is enabled (and why to CentOS and SELinux disabled?!), we will periodically receive swearing in the logs like:
type=AVC msg=audit(1410648780.359:195): avc: denied { module_request } for pid=727 comm="chronyd" kmod="net-pf-10" scontext=system_u:system_r:chronyd_t:s0 tcontext=system_u:system_r:kernel_t:s0 tclass=system
So there is a more gentle option disable IPv6:
$ nano -w /etc/sysctl.d/01-disable_ipv6.conf
net.ipv6.conf.all.disable_ipv6 = 1
net.ipv6.conf.default.disable_ipv6 = 1
$ systemctl restart systemd-sysctl.service
Similarly, after disabling IPv6 were not superfluous rantings from different services in the logs – you need to edit the configs postfix, time synchronization daemon chrony and sshd:
$ sed -i 's/inet_protocols = [^ ]*/inet_protocols = ipv4/g' /etc/postfix/main.cf
$ systemctl restart postfix.service
$ sed -i 's/^\(bindcmdaddress ::1\)/#\1/' /etc/chrony.conf
$ nano -w /etc/sysconfig/chronyd
OPTIONS="-4"
$ chcon -u system_u /etc/sysconfig/chronyd
$ systemctl restart chronyd.service
$ sed -i s/udp6/#udp6/ /etc/netconfig
$ sed -i s/tcp6/#tcp6/ /etc/netconfig
$ nano -w /etc/ssh/sshd_config
AddressFamily inet
ListenAddress 0.0.0.0

$ systemctl restart sshd.service
Setting up sshd daemon
On the new server, I immediately disable the authorization by password, leave only the authorization by key. And password authorization I authorize only certain IP addresses:
$ nano -w /etc/ssh/sshd_config
PasswordAuthentication no
...
Match address 1.2.3.4/32
	PasswordAuthentication yes
Match address 2.3.4.5/32
	PasswordAuthentication yes

$ systemctl restart sshd.service
Note: use only if you know what you are doing!
Configure the package manager
Limit the number of installed package versions up to 3 (for example the number of versions of the installed kernel):
$ nano -w /etc/yum.conf
installonly_limit=3
$ yum -y install yum-cron yum-utils
Turn on the check for new versions of packages (new versions will be coming in the mail, packages will not be automatically updated):
$ nano -w /etc/yum/yum-cron.conf
download_updates = no
$ systemctl enable yum-cron.service
$ systemctl start yum-cron.service
Updating the base system after installation
$ yum -y update
Installing the necessary tools and programs
Now connect the EPEL repository (Extra Packages for Enterprise Linux) and install packages, not in the basic installation:
$ yum -y install epel-release
$ yum -y install bash-completion logwatch lsscsi mc mlocate mtr nfs-utils parted pciutils \
         pinfo policycoreutils-python rsync screen sysstat telnet unzip usbutils wget
There is also an interesting package atop in which you can see the statistics of the real-time server usage by processes and devices. But at the moment this package for CentOS 7 EPEL repository is in test, so is it with the following command:
$ yum -y install atop --enablerepo=epel-testing
Update: atop already placed into the main repository, so it can be installed simply by running:
$ yum -y install atop
But statistics looks like this:
ATOP - centos            2014/09/14  15:12:22            ---------             12h1m4s elapsed
PRC |  sys   37.23s   |  user  12.51s   |  #proc    194  |   #zombie    0  |   #exit      0  |
CPU |  sys       0%   |  user      0%   |  irq       0%  |   idle    400%  |   wait      0%  |
cpu |  sys       0%   |  user      0%   |  irq       0%  |   idle    100%  |   cpu002 w  0%  |
cpu |  sys       0%   |  user      0%   |  irq       0%  |   idle    100%  |   cpu001 w  0%  |
cpu |  sys       0%   |  user      0%   |  irq       0%  |   idle    100%  |   cpu003 w  0%  |
cpu |  sys       0%   |  user      0%   |  irq       0%  |   idle    100%  |   cpu000 w  0%  |
CPL |  avg1    0.00   |  avg5    0.01   |  avg15   0.05  |   csw  1279901  |   intr 4020376  |
MEM |  tot   990.6M   |  free  538.6M   |  cache 198.1M  |   buff    0.7M  |   slab  136.9M  |
SWP |  tot     3.8G   |  free    3.8G   |                |   vmcom 309.8M  |   vmlim   4.3G  |
LVM |  ntos-lv_root   |  busy      0%   |  read    5419  |   write   5933  |   avio 0.65 ms  |
LVM |  ntos-lv_swap   |  busy      0%   |  read     216  |   write      0  |   avio 0.07 ms  |
DSK |           sda   |  busy      0%   |  read    6164  |   write   6056  |   avio 0.61 ms  |
NET |  transport      |  tcpi 6376629   |  tcpo 6373269  |   udpi    2957  |   udpo    2966  |
NET |  network        |  ipi  6439613   |  ipo  6376153  |   ipfrw      0  |   deliv 6380e3  |
NET |  eth0    ----   |  pcki 6443870   |  pcko 6377318  |   si   75 Kbps  |   so   77 Kbps  |
NET |  lo      ----   |  pcki       6   |  pcko       6  |   si    0 Kbps  |   so    0 Kbps  |
                        *** system and process activity since boot ***
  PID   TID  THR SYSCPU USRCPU  VGROW  RGROW  RDDSK  WRDSK ST EXC S CPUNR  CPU CMD        1/10
  704     -    5  0.76s  7.78s 537.1M 16096K  2784K    16K N-   - S     3   0% tuned
   41     -    1  7.72s  0.00s     0K     0K     0K     0K N-   - S     2   0% rcu_sched
   44     -    1  6.17s  0.00s     0K     0K     0K     0K N-   - S     3   0% rcuos/2
  467     -    1  4.50s  0.00s     0K     0K     0K     0K N-   - S     0   0% xfsaild/dm-0
  705     -    1  3.67s  0.69s 19112K  1172K   144K     0K N-   - S     3   0% irqbalance
    1     -    1  1.45s  0.54s 50028K  6624K 45321K    84K N-   - S     0   0% systemd
  549     -    1  1.36s  0.37s 54308K  6544K   584K     0K N-   - S     2   0% systemd-journa
   43     -    1  1.23s  0.00s     0K     0K     0K     0K N-   - S     3   0% rcuos/1
  709     -    2  0.33s  0.54s 34996K  2072K   612K     0K N-   - S     2   0% dbus-daemon
  712     -    1  0.78s  0.08s 123.4M  1728K 14104K 15356K N-   - S     2   0% crond
  827     -    3  0.26s  0.49s 441.1M  8900K  9640K     0K N-   - S     3   0% NetworkManager
   75     -    1  0.75s  0.00s     0K     0K     0K     0K N-   - S     1   0% watchdog/1
  698     -    2  0.37s  0.33s 319.6M 20924K 11148K     4K N-   - S     0   0% firewalld
   45     -    1  0.69s  0.00s     0K     0K     0K     0K N-   - S     2   0% rcuos/3
   74     -    1  0.67s  0.00s     0K     0K     0K     0K N-   - S     0   0% watchdog/0
   80     -    1  0.62s  0.00s     0K     0K     0K     0K N-   - S     2   0% watchdog/2
   85     -    1  0.60s  0.00s     0K     0K     0K     0K N-   - S     3   0% watchdog/3
 2373     -    1  0.41s  0.09s 130.3M  4956K   268K     4K N-   - S     3   0% sshd
  738     -    1  0.46s  0.00s     0K     0K     0K     0K N-   - S     0   0% kworker/0:3
 2378     -    1  0.14s  0.31s 113.5M  3092K 76272K 27208K N-   - S     1   0% bash
 1836     -    1  0.36s  0.06s 91528K  2200K   284K     8K N-   - S     2   0% master
Configuring the desktop environment
For convenient work in the console in the home directory, you must create files on the locale often used aliases and settings for various utilities:
$ nano -w ~/.bash_profile
#----------------------------------------------------------------------------
# ~/.bash_profile: executed by bash(1) for login shells.
# $Revision: 2.20 (CentOS/OS X Edition by Wakko Warner) $
# $Comment: Any comments please send to wakko@acmelabs.spb.ru $
#----------------------------------------------------------------------------

# If not running interactively, don't do anything
[ -z "$PS1" ] && return

# Test for an interactive shell. There is no need to set anything
# past this point for scp and rcp, and it's important to refrain from
# outputting anything in those cases.
if [[ $- != *i* ]] ; then
	# Shell is non-interactive.  Be done now!
	return
fi

# Source global definitions
if [ -f /etc/bashrc ]; then
	. /etc/bashrc
fi

# Include ~/.config/bashrc.d/* if it exists
if [ -d ~/.config/bashrc.d ]; then
	for i in `ls ~/.config/bashrc.d/` ; do
		if [[ -f ~/.config/bashrc.d/${i} ]]; then
			. ~/.config/bashrc.d/${i}
		fi
	done
	unset i
fi

$ nano -w ~/.bash_logout
#----------------------------------------------------------------------------
# ~/.bash_logout: executed by bash(1) when login shell exits.
# $Revision: 2.10 (CentOS Edition by Wakko Warner) $
# $Comment: Any comments please send to wakko@acmelabs.spb.ru $
#----------------------------------------------------------------------------

# When leaving the console clear the screen to increase privacy
if [ "$SHLVL" = 1 ]; then
	[ -x /usr/bin/clear_console ] && /usr/bin/clear_console -q
	[ -x /usr/bin/clear ] && /usr/bin/clear -q
fi

$ mkdir -p ~/.config/bashrc.d

$ nano -w ~/.config/bashrc.d/00-aliases
#----------------------------------------------------------------------------
# ~/.config/bashrc.d/00-aliases: executed by .bash_profile for aliases
# $Revision: 2.20 (CentOS/OS X Edition by Wakko Warner) $
# $Comment: Any comments please send to wakko@acmelabs.spb.ru $
#----------------------------------------------------------------------------

# Alias definitions.
alias cp='cp -i'
alias df='df -h'
alias du='du -h'
alias flushdns='sudo discoveryutil udnsflushcaches'
alias less='less -r'
alias ll='ls -lp'
#alias ls='ls --color=auto'
alias md='mkdir'
alias mtr='mtr -o "LRSD NBAWV"'
alias mv='mv -i'
alias pman='pinfo -m'
alias px='ps xa'
alias rd='rmdir'
alias rm='rm -i'
alias scp='scp -p -r'
alias screen='[ -z "$HUSHLOGIN" ] && TERM=xterm screen -D -RR || TERM=linux screen -D -RR'
alias su='su -'
alias sudo='sudo -s'
alias showextip='curl http://ipecho.net/plain; echo'
alias watch='watch '
alias which='alias | /usr/bin/which --tty-only --read-alias --show-dot --show-tilde'
alias who='who -HuT'

$ nano -w ~/.config/bashrc.d/01-locale
#----------------------------------------------------------------------------
# ~/.config/bashrc.d/01-locale: executed by .bash_profile for locale settings
# $Revision: 2.20 (CentOS/OS X Edition by Wakko Warner) $
# $Comment: Any comments please send to wakko@acmelabs.spb.ru $
#----------------------------------------------------------------------------

# Locale definitions.
#export LC_ALL=""
#export LANG="ru_RU.UTF-8"
#export LC_NUMERIC="C"
#export LC_TIME="POSIX"

# Set english messages for root.
[ ${EUID} == 0 ] && export LC_MESSAGES="POSIX"

$ nano -w ~/.config/bashrc.d/02-terminal
#----------------------------------------------------------------------------
# ~/.config/bashrc.d/02-terminal: executed by .bash_profile for terminal settings
# $Revision: 2.20 (CentOS/OS X Edition by Wakko Warner) $
# $Comment: Any comments please send to wakko@acmelabs.spb..ru $
#----------------------------------------------------------------------------

# Set variable identifying the chroot you work in (used in the prompt below)
if [ -z "$debian_chroot" ] && [ -r /etc/debian_chroot ]; then
	debian_chroot=$(cat /etc/debian_chroot)
fi

# Set colorful PS1 only on colorful terminals.
# dircolors --print-database uses its own built-in database
# instead of using /etc/DIR_COLORS or /etc/dircolors.
# Try to use the external file first to take advantage of user additions.
use_color=false
safe_term=${TERM//[^[:alnum:]]/.}	# sanitize TERM

if [ -f /etc/DIR_COLORS ]; then
	grep -q "^TERM ${safe_term}" /etc/DIR_COLORS && use_color=true
elif [ -f /etc/dircolors ]; then
	grep -q "^TERM ${safe_term}" /etc/dircolors && use_color=true
elif type -p dircolors >/dev/null ; then
	if dircolors --print-database | grep -q "^TERM ${safe_term}" ; then
		use_color=true
	fi
fi

if ${use_color} ; then
	if [ ${EUID} == 0 ]; then
		PS1='${debian_chroot:+($debian_chroot)}\[\033[01;31m\]\h\[\033[00m\]:\[\033[01;34m\]\w\[\033[00m\]\$ '
	else
		PS1='${debian_chroot:+($debian_chroot)}\[\033[01;32m\]\u@\h\[\033[00m\]:\[\033[01;34m\]\w\[\033[00m\]\$ '
	fi
#	PROMPT_COMMAND='echo -ne "\033]0;${USER}@${HOSTNAME}: ${PWD/$HOME/~}\007"'
	eval "`dircolors -b`"
	alias ls='ls --color=auto'
	alias dir='ls --color=auto --format=vertical'
	alias vdir='ls --color=auto --format=long'
	alias less='less -r'
else
	if [ ${EUID} == 0 ]; then
		PS1='${debian_chroot:+($debian_chroot)}\h:\w\$ '
	else
		PS1='${debian_chroot:+($debian_chroot)}\u@\h:\w\$ '
	fi
fi

$ nano -w ~/.config/bashrc.d/03-userfiles
#----------------------------------------------------------------------------
# ~/.config/bashrc.d/03-userfiles: executed by .bash_profile for user files
# $Revision: 2.00 (CentOS/OS X Edition by Wakko Warner) $
# $Comment: Any comments please send to wakko@acmelabs.spb..ru $
#----------------------------------------------------------------------------

# User specific environment and startup programs
if [ -d $HOME/bin ]; then
	PATH=$PATH:$HOME/bin
	export PATH
fi
# do the same with MANPATH
if [ -d $HOME/man ]; then
	MANPATH=${MANPATH:-:}:$HOME/man
	export MANPATH
fi

$ nano -w ~/.config/bashrc.d/99-other
#----------------------------------------------------------------------------
# ~/.config/bashrc.d/99-other: executed by .bash_profile for other settings
# $Revision: 2.20 (CentOS/OS X Edition by Wakko Warner) $
# $Comment: Any comments please send to wakko@acmelabs.spb.ru $
#----------------------------------------------------------------------------

# Don't put duplicate and garbage lines from Midnight Commander to the history.
export HISTCONTROL="ignoreboth"

# Check the window size after each command and, if necessary,
# update the values of LINES and COLUMNS.
shopt -s checkwinsize

# Make less more friendly for non-text input files, see lesspipe(1)
#[ -x /usr/bin/lesspipe ] && eval "$(lesspipe)"
After you create these files, it is best to log in order to apply all the changes.
Setup utility screen
I love working in the screen, first if, suddenly fall off the connection to the remote server, the session is complete, and will continue his run. This is especially true when remotely started a long process that should not be interrupted.
Plus, I adjusted the screen in such a way that it starts as soon as we have created 10 consoles, and switch between them as easily as if you were sitting for the protection of Linux console Alt+F1, Alt+F2, etc to Alt+F10. You can also press Ctrl+Alt+Left/Right arrow to switch between consoles left-to-right.
$ nano -w ~/.screenrc
#----------------------------------------------------------------------------
# ~/.screenrc: executed by screen for user settings
# $Revision: 2.10 (CentOS Edition by Wakko Warner) $
# $Comment: Any comments please send to wakko@acmelabs.spb.ru $
#----------------------------------------------------------------------------

  hardstatus string "[screen %n%?: %t%?] %h"
  defshell -bash
  shell -$SHELL

# VARIABLES
# ===============================================================
# Automatically detach on hangup.
  autodetach on				# default: on
# Don't display the copyright page
  startup_message off			# default: on
# Affects the copying of text regions
  crlf off				# default: off
# Change default scrollback value for new windows
  defscrollback 1000			# default: 100
# Define the time that all windows monitored for silence should
# wait before displaying a message. Default 30 seconds.
  silencewait 15			# default: 30
# UTF-8 support
  defutf8 on
# PuTTY tweaks
  termcapinfo xterm* ti@:te@
  termcapinfo xterm ti@:te@

# KEYBINDINGS
# ==============================================================
# Alt+Fn keys.
  bindkey "^[^[OC" next
  bindkey "^[^[OD" prev
  bindkey "^[^[OP" select 0
  bindkey "^[^[OQ" select 1
  bindkey "^[^[OR" select 2
  bindkey "^[^[OS" select 3
  bindkey "^[^[[15~" select 4
  bindkey "^[^[[17~" select 5
  bindkey "^[^[[18~" select 6
  bindkey "^[^[[19~" select 7
  bindkey "^[^[[20~" select 8
  bindkey "^[^[[21~" select 9

# STARTUP SCREENS
# ===============================================================
# Uncomment one/some following lines to automatically let
# SCREEN start some programs in the given window numbers:
# screen -t IRC         1 irssi
# screen -t EDIT        1 vim
# screen -t GOOGLE      2 links http://www.google.com
# screen -t NEWS        3 slrn
# screen -t WWW         4 links http://rt.com
  screen -t F1		0
  screen -t F2		1
  screen -t F3		2
  screen -t F4		3
  screen -t F5		4
  screen -t F6		5
  screen -t F7		6
  screen -t F8		7
  screen -t F9		8
  screen -t F10		9
  select 0
Note: If you run Midnight Commander in screen, that he had not worked for the subshell (not worked for shell in mc). To fix, add this line to your file .screenrc line “shell -$SHELL“.
Customizing the editor nano
Nano is a great little Editor. But a lot of it is undeservedly not love. This is for good reason. With small tuning nano can even syntax highlighting. Not as cool as the same vim, but in general it is better than black and white.
$ nano -w ~/.nanorc
#----------------------------------------------------------------------------
# ~/.nanorc: executed by nano for user settings
# $Revision: 2.10 (CentOS Edition by Wakko Warner) $
# $Comment: Any comments please send to wakko@acmelabs.spb.ru $
#----------------------------------------------------------------------------

## Constantly display the cursor position in the status bar.
  set const

## Enable mouse support, so that mouse clicks can be used to set the
## mark and run shortcuts.
  set mouse

## Don't wrap text at all.
  set nowrap

## Use smooth scrolling as the default.
  set smooth

## -----------------------------------------------------------------------------
## *conf-files
#
  syntax "configfiles" "\/etc" "(\.|/|)ini$" "(\.|/|)cf$" "(\.|/|)conf$" "(\.|/|)cnf$" "(\.|/|)include$" "(\.|/|)ample$" "(\.|/|)globals$" "xfce.*$" "syslog-ng" "sudoers" "(\.|/|)config$" "(\.|/|)COLORS$" "(\.|/|)colors$"
  color red "/.*$" "TERM" "\..*$" "=.*$" "\*.*$"
  color brightgreen ":unscaled" "[0-9]"
  color brightwhite "setenv|export" "\;"
  color brightwhite "\<(alias)\>"
  color brightgreen "<(\\.|[^'])*>"
  color magenta "[a-zA-Z_0-9\-\ \	]+(	| |)+="
  color brightwhite ">(\\.|[^'><])*" "\<(logfile)\>" "\<(driftfile)\>" "\<(restrict)\>"
  color brightwhite ":unscaled" "http\:\/\/" "ftp\:\/\/" "rsync\:\/\/"
  color magenta "'(\\.|[^'])*'"
  color brightwhite "[0-9]"
  color brightwhite "[<>]"
  color brightgreen "\[[a-zA-Z_0-9\ \-]+\]"
  color magenta "Section" "EndSection" "SubSection" "EndSubSection"
  color red "\<(root)\>"
  color brightred,blue "^.*-->" start="<!--.*" end="$"
## strings
  color brightyellow "\"(\\.|[^\"])*\"" "'(\\.|[^'])*'" "`(\\.|[^'])*`" "\{(\\.|[^'])*\}"
## comments
  color green "^( *|	*)#.*$" start="<!--" end="-->"
  color green ";.*$"
## header
  color brightgreen "^( *|	*)[#;]+ *\/etc\/[a-zA-Z_0-9]+.*$"
  color brightgreen "^( *|	*)[#;]+ *\$[a-zA-Z_0-9]+:.*$"

## -----------------------------------------------------------------------------
## /etc/group, /etc/passwd, /etc/shadow
#
  syntax "passwd" "(\.|/|)group(.*)$" "(\.|/|)passwd(.*)$" "(\.|/|)shadow(.*)$"
  color white ".*$"
  color green "\:.*$"
  color yellow "\:*\:"
  color cyan "/.*$"
  color red "/bin/false"
  color red "/sbin/nologin"
  color brightred "root"
  color brightgreen "/bin/.*sh"
  color white "[0-9]"
  color magenta "\:\/.*\:"

## -----------------------------------------------------------------------------
## *tab-files ( e.g. fstab, crontab, inittab )
#
  syntax "fstab" "(\.|/|)tab$"
  color brightwhite "[0-9,\*]"
  color yellow "-([a-z])\>"
  color magenta "\<(none)\>.*$" "\<(wait)\>" "\<(respawn)\>"
  color red "/dev/hd.*$" "\<(ctrlaltdel)\>" "\<(initdefault)\>"
  color brightgreen "/dev/sr.*$" "/dev/cd.*$" "\/sbin.*$"
  color cyan "/dev/sd.*$"
  color brightcyan "^.*(nfs|smbfs|tmpfs).*$"
  color yellow "/dev/fd.*$"
  color red "root"
  color cyan "\<(rm|test)\>"
  color cyan "((\/|\/usr\/|\/usr\/local\/)(bin\/|sbin\/)[a-zA-Z_0-9,-]+)"
  color magenta "(\$|)[a-zA-Z_0-9]+( |)="
  color red "\$\{?[a-zA-Z_0-9]+\}?"
## comments
  color green "^( *|	*)#.*$"
## header
  color brightgreen "^( *|	*)[#]+ *\$[a-zA-Z_0-9]+:.*$"

## Color setup
  include "/usr/share/nano/asm.nanorc"
  include "/usr/share/nano/awk.nanorc"
  include "/usr/share/nano/cmake.nanorc"
  include "/usr/share/nano/c.nanorc"
  include "/usr/share/nano/css.nanorc"
  include "/usr/share/nano/debian.nanorc"
  include "/usr/share/nano/fortran.nanorc"
  include "/usr/share/nano/gentoo.nanorc"
  include "/usr/share/nano/groff.nanorc"
  include "/usr/share/nano/html.nanorc"
  include "/usr/share/nano/java.nanorc"
  include "/usr/share/nano/lua.nanorc"
  include "/usr/share/nano/makefile.nanorc"
  include "/usr/share/nano/man.nanorc"
  include "/usr/share/nano/mgp.nanorc"
  include "/usr/share/nano/mutt.nanorc"
  include "/usr/share/nano/nanorc.nanorc"
  include "/usr/share/nano/objc.nanorc"
  include "/usr/share/nano/ocaml.nanorc"
  include "/usr/share/nano/patch.nanorc"
  include "/usr/share/nano/perl.nanorc"
  include "/usr/share/nano/php.nanorc"
  include "/usr/share/nano/pov.nanorc"
  include "/usr/share/nano/python.nanorc"
  include "/usr/share/nano/ruby.nanorc"
  include "/usr/share/nano/sh.nanorc"
  include "/usr/share/nano/spec.nanorc"
  include "/usr/share/nano/tcl.nanorc"
  include "/usr/share/nano/tex.nanorc"
  include "/usr/share/nano/xml.nanorc"
Finish
And, finally, reboot our server:
$ reboot
Update: features of temporary work with qwertz
If, all of a sudden, you will install CentOS on some German qwertz layout, hosting without the ability to change it for the qwerty, it is necessary to remember the following:
z == y
y == z
_ == Shift + /
/ == -
- == \
: == Num Lock, Left Alt + 058 (NumPad)
Just don’t forget the password that you enter with the keyboard qwertz then not suitable when accessed via ssh, so that at the time of installation, put a simple password, then when you first login via ssh, already change it to normal.
Configure various services
Also, you can read the following notes on setting up various services in CentOS/RHEL:
- How to Install and configure syslog-ng
- How to Install and configure DNS-server (bind)
- SSL/TLS-certificates for lazy people
- How to Install and configure VPN-server (OpenVPN)
- How to Install and configure LAMP-server (Linux, Apache, MariaDB/MySQL, PHP)
- How to Install and configure mail-server (Postfix, Dovecot, MariaDB/MySQL)
- How to Install and configure spam-filter DSpam (dspam, dspam-web, dovecot-antispam)
- How to Install and configure mail web-interface (RoundCube)